Multi-Account/Environment DNS Zones
03 April 2024
One of the best practices for running and developing a service is to separate
each environment into its own account. AWS Organizations enables this to be done
easily. However, we often see examples where environment names are subdomains of
one of our product's domain, such as dev.example.com or staging.example.com.
Let's assume that a team wants to create a new microservice and only make it
available in the dev environment for now. Normal flow would be to have an IAM
role in the account where the zone is hosted or file a ticket to the team
responsible. Can we improve this flow? Well, yes, that's what NS records are
for!
What's more imagine that the team is working on splitting one larger service
into smaller services and the design is very dynamic - they delete and create
new subdomains often for the new service parts. Normally they need to create
both records in Route 53 and change Application Load Balancer rules. Can this be
improved or do we need to create an IaC module for these both things? No need
to, we can do it easily using *. record names - they will match anything
prefixing the subdomain.
In today's post we will learn:
- How to delegate subdomain management to different accounts thus potentially different teams,
- How to use
*in record names and let ALB handle the routing.
Preparing multiple environments
On my management account (which is the top-level one you have), I activated AWS
Organizations. I created two accounts: dev and staging and activated MFA
for their root users by resetting the password and assigning an MFA device. Both
Organizations and multiple accounts are free of charge.
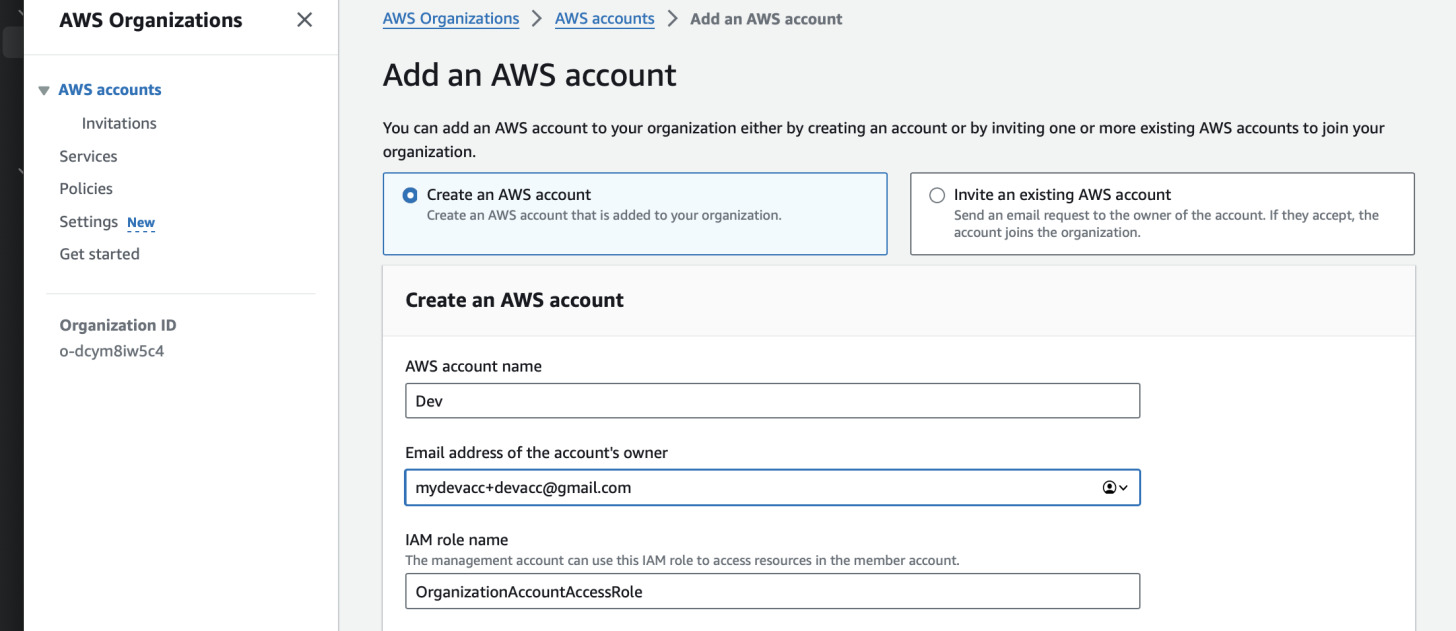
In order to access these accounts further, we can either create a new IAM user or just access them through the role provided by AWS Organizations - the management account can assume this role. I will choose the latter as it is easier than to remember all the credentials.
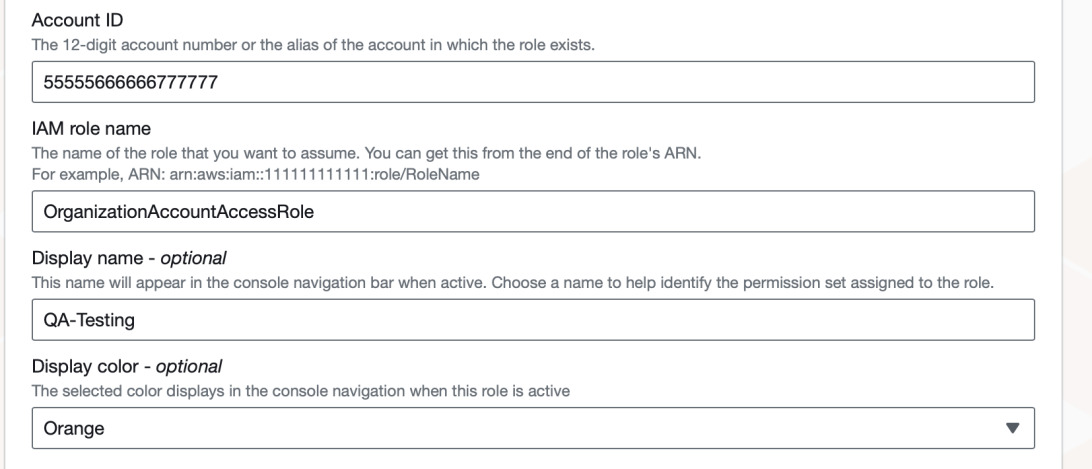
To switch the role, note down each account ID (you can view them in the AWS
Organizations tree) and the role name if you specified a different one. I kept
the default OrganizationAccountAccessRole. Next in the management account in
AWS console click on the top right corner and press "Switch Role" button. In the
new form you see, fill the account ID you plan to switch to and the role name.
The two bottom fields are only for your own information. The form below might
look different - some AWS regions have a different design.
Creating the hosted zone for the domain
For this step you need a domain. It will cost something (depends on the market and TLD). You can buy it with Route 53 but I prefer to use different registrars as some of them have cheaper offers. For this example I will use Gandi and a domain I already own. If you used Route 53 Domains you can skip these steps as the default zone is created for you; go to "Creating zones in subaccounts" chapter.
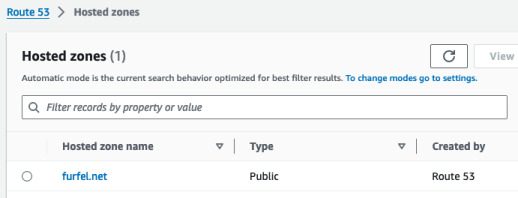
If you already have a domain from non-AWS registrar, you need to create one hosted zone for now. this can be done from any account but to keep things clean, I will do it from the management account. Go to Route 53 console and in the left menu click "Hosted zones" (if the panel is hidden, use three lines button to expand it). Click "Create hosted zone". Name the new zone exactly as your domain. Be sure to select public hosted zone.
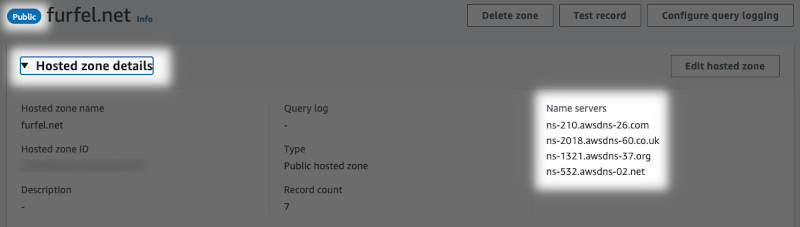
Now we need to get the NS records for this zone and share it with our registrar.
This will ensure that TLD server (such as .com) knows where to redirect the
queries to.
Change NS records at your registrar
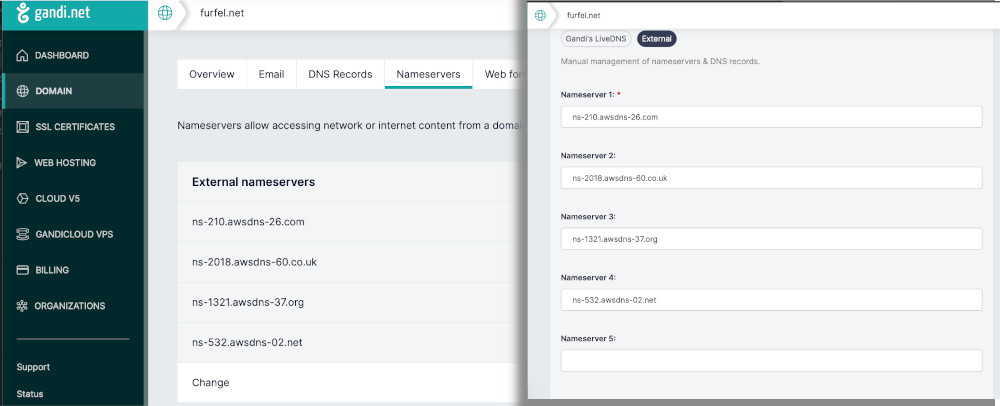
First, open the new zone in Route 53. Expand details at the top and copy the records.
Now log in to your registrar's dashboard and open your domain settings. Find where are the nameservers stored. In Gandi it is just a tab named "Nameservers". Enter all the values you copied from Route 53 and save the changes. After you do this, it might take even up to 48 hours for the changes to propagate. However, worth noting is that in Gandi case, the zone is free of charge. In Route 53 a public zone costs $0.50 a month.
Creating zones in subaccounts
Now switch to one of the subaccounts your created previously and navigate to
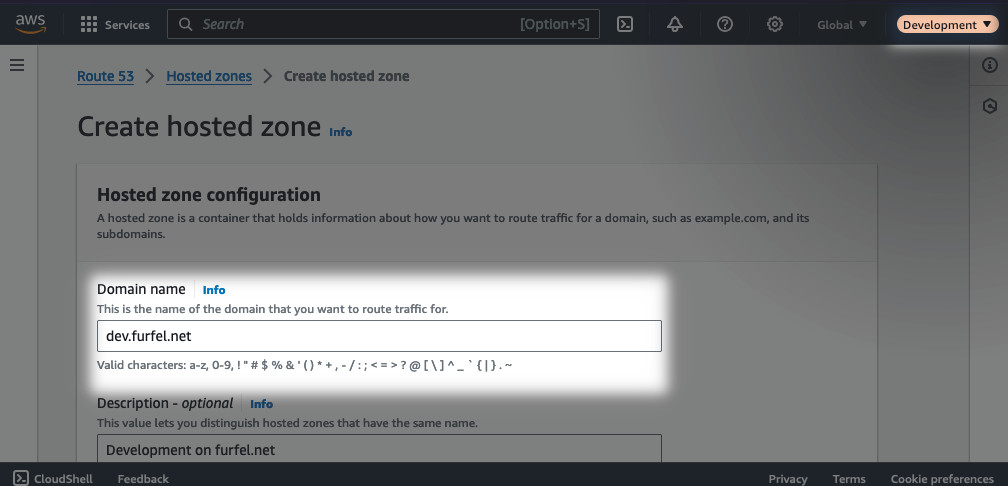
Route 53. Create a new public hosted zone. The name should be in the format of
development.mydomain.com. This is the subdomain that will be delegated from
the parent zone mydomain.com. Each such zone is also charged at $0.50 a month.
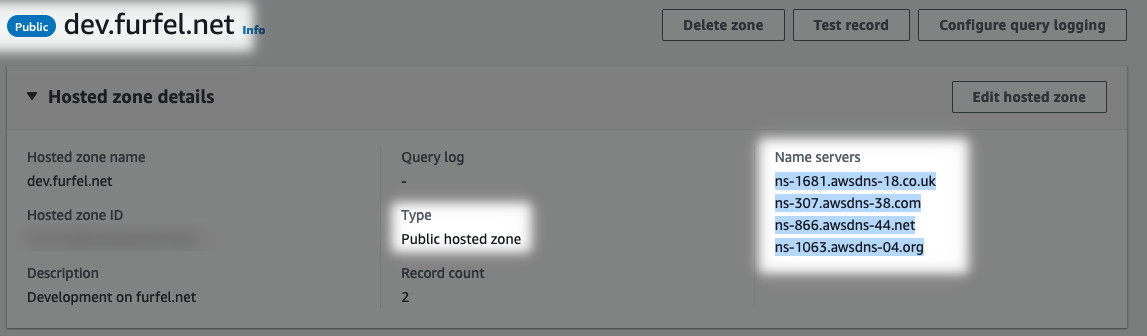
Note down the name servers in zone details. Copy them somewhere and switch back
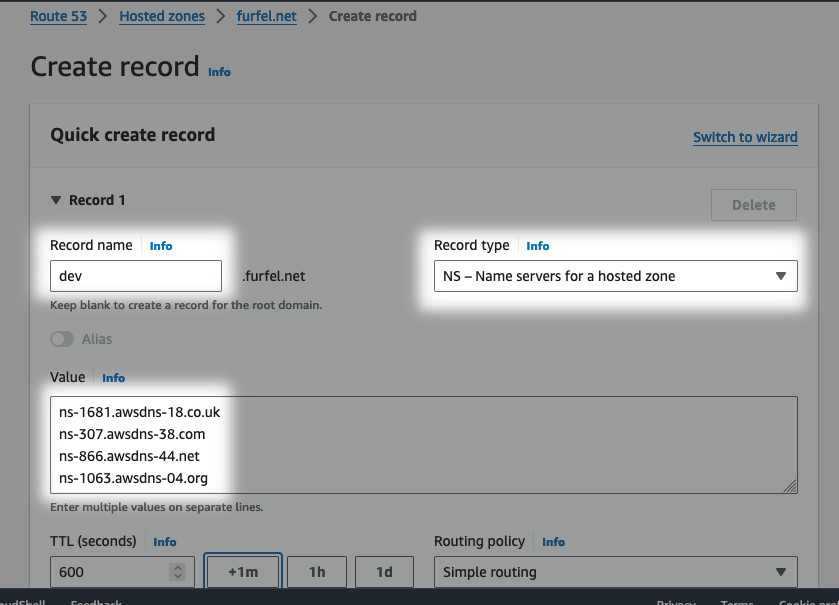
to the account where the parent zone is hosted. Open the parent zone and create
a new record. Before you can select type NS, you have to type something into
the name field. Make it the same as the subdomain you created in the subaccount.
Repeat these steps for as many accounts and zones as you want.
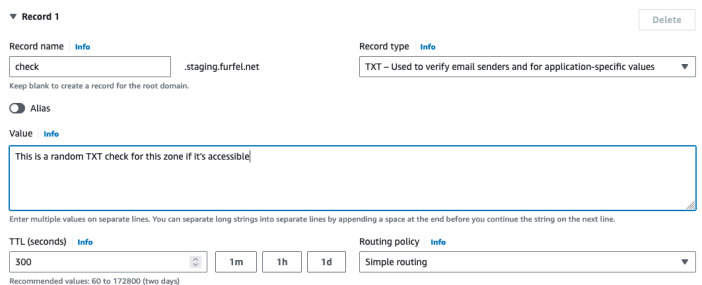
In order to test if the delegation worked, switch to one of the subaccounts and
create a new record. It can be a CNAME, TXT or even Alias with ALB. I will just
create a TXT record and test with with dig. Now when your DNS server will
query for development.mydomain.com, it will first ask the parent zone's name
servers if there are any NS records for this subdomain. In such case, another
query will be done against the subaccount zone's name servers.
Next we can query the record from our local machine. To do this we can utilize
dig utility. If you don't have it, you can use CloudShell and install it with
sudo yum install bind-utils. Replace the example below with your record and
type. If you get the answer that means that our setup was successful and the
resolver works as expected: it queried the parent zone for
staging.mydomain.com and got NS reply: "Continue with another authority to
get the record" and finally found our subaccount zone. From there it asked for
check.staging.mydomain.com and got the TXT record.
$ dig +short TXT check.staging.furfel.net
"This is a random TXT check for this zone if it's accessible"
Using asterisks in record names
Another cool feature of Route 53 is the ability to use * in record names.
This can help us match entire subdomains using a single record. Let's say that
we have a microservice that uses Application Load Balancer that changes target
based on HTTP host header. Instead of adding the record for each subdomain, we
just set *.accounts.dev.mydomain.com as an Alias to our ALB and let it handle
all the rules. However, watch out for the caveats: if you put * in the middle
of the record name it will be treated as a literal character. What's more * is
not an officially supported character in DNS but Route 53 can handle it. We will
now test how it works.
Experiment: How the wildcards work?
First, let's create some records in the zone. We will test the following records in a new subdomain in the parent zone:
*.service.mydomain.com->www.example.comabc*def.other.mydomain.com->abc.example.com*xyz.other.mydomain.com->xyz.example.com
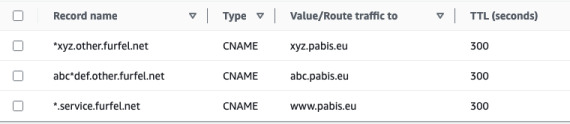
It is enough if we put TXT or CNAME records for each of those. What we want
to see is which records are matched with wildcards and which are literals. dig
can help us again. Try to resolve the records by putting literal * and by
trying to place a string inside the *. Replace furfel.net with your actual
domain.
$ dig +short CNAME '*.service.furfel.net'
www.pabis.eu.
$ dig +short CNAME 'abc.service.furfel.net'
www.pabis.eu.
$ dig +short CNAME 'abc1def.other.furfel.net'
<no answer>
$ dig +short CNAME 'abc*def.other.furfel.net'
abc.pabis.eu.
$ dig +short CNAME 'xyz.other.furfel.net'
<no answer>
$ dig +short CNAME 'axyz.other.furfel.net'
<no answer>
$ dig +short CNAME '*xyz.other.furfel.net'
xyz.pabis.eu.
Integrating the ALB
We are now sure that only *. works as a form of wildcard while other records
are treated as literals. The former can be used for microservices behind an ALB.
Let's create one with some rules that will simply reply with static text so that
we can demonstrate routing based on the HTTP Host header and the default
response. We need to do it either using CloudFormation, Terraform or CLI because
AWS console wizard doesn't allow to select fixed response for the default rule.
I will create an ALB, HTTP listener and security group allowing anyone on port
80 using Terraform. I will continue to use Terraform for the rest of this post
to keep some consistency. However, you can just create a new ALB using AWS CLI
and continue using AWS web console.
resource "aws_security_group" "HTTP" {
  name        = "HTTP"
  description = "Allow HTTP inbound traffic"
  vpc_id      = data.aws_vpc.default.id

  ingress {
    from_port   = 80
    to_port     = 80
    protocol    = "tcp"
    cidr_blocks = ["0.0.0.0/0"]
  }
}

resource "aws_alb" "ALB" {
  name            = "MyALB"
  subnets         = slice(data.aws_subnets.default.ids, 0, 2)
  security_groups = [aws_security_group.HTTP.id]
}

resource "aws_alb_listener" "http" {
  load_balancer_arn = aws_alb.ALB.arn
  port              = 80
  protocol          = "HTTP"

  default_action {
    type = "fixed-response"
    fixed_response {
      content_type = "text/html"
      message_body = "<html><body><h1>Fall through!</h1></body></html>"
      status_code  = "200"
    }
  }
}
In the example above I use default VPC to deploy the ALB. You can replace the values with your own created VPC or just see this file for reference.
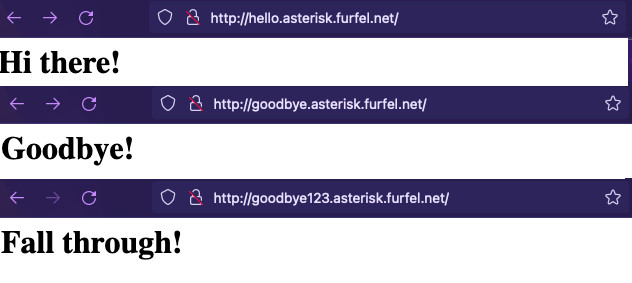
Now if we associate the wildcard subdomain with the ALB, it will always reply
with the default response - Fall through! - seen above. We can create more
rules in the ALB to test if it's detecting the host header. See two examples
below:
resource "aws_alb_listener_rule" "hello" {
  listener_arn = aws_alb_listener.http.arn
  priority     = 100

  condition {
    host_header { values = ["hello.asterisk.${var.DomainName}"] }
  }

  action {
    type = "fixed-response"
    fixed_response {
      content_type = "text/html"
      message_body = "<html><body><h1>Hi there!</h1></body></html>"
      status_code  = "200"
    }
  }

}

resource "aws_alb_listener_rule" "goodbye" {
  listener_arn = aws_alb_listener.http.arn
  priority     = 101

  condition {
    host_header { values = ["goodbye.asterisk.${var.DomainName}"] }
  }

  action {
    type = "fixed-response"
    fixed_response {
      content_type = "text/html"
      message_body = "<html><body><h1>Goodbye!</h1></body></html>"
      status_code  = "200"
    }
  }
}

If we navigate in the browser to both of the links we will see that both
goodbye and hello rules are matched and others just use the default ALB
response. This way we can just define one record in Route 53 zone and let the
ALB handle all the needed logic. What is more, the changes in rules are
immediate compared to DNS TTL. In real world scenario, you would replace above
fixed responses with some container or EC2 targets.
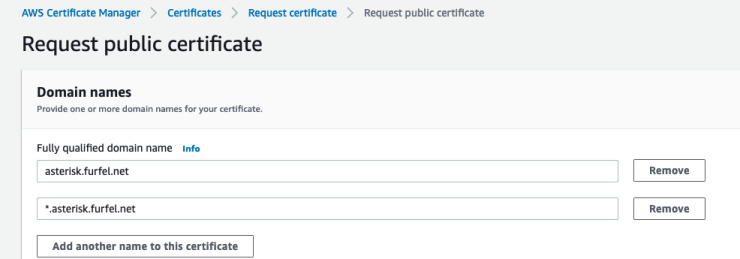
For HTTPS you can easily request a wildcard certificate from ACM (for one
subdomain) when you enter *.subdomain.yourdomain.com in the additional names
field. Such certificate will be valid for same level subdomain such as
hello.subdomain.yourdomain.com but not for xyz.abc.subdomain.yourdomain.com.
It's also impossible to request *.*.subdomain.yourdomain.com certificate.
Summary
We learned how easy it is to share the domains with other accounts to manage. With this approach we improve productivity and the flow of work. What is more, there's no more need to create special roles for different teams to access their own records.
We also saw the wildcard domains that help us manage multiple subdomains or services from one place, namely the ALB. This way we can quickly add new services without going back and editing the Route 53 zone or creating a module for handling both resources.