Lambda@Edge: Select test origin or stick to the old
11 March 2024
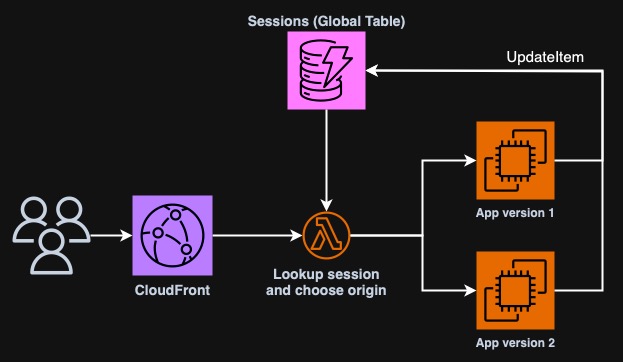
Last Friday I joined the live stream of AWS Power Hour: Architecting Professional Season 2. As in every episode, we went through some example questions. I decided to take one of them and implement a working solution. The question I picked states: there's a company that uses CloudFront to host a website on two origin servers. They deployed a new app version on one of the origins and they want to route the traffic to the new app for a small percentage of users. However, users who currently use the old version, should be able to finish their activities there. The answer is: implement a new Lambda@Edge function that examines requests from users, check if the session in the cookie is new and only then route some users to the new version. Users with a session in progress should remain on their version. For reference, check out this Power Hour episode and here the full schedule if you are interested.
It's possible to just keep application version in the cookie. Other possible
ways could be JWT tokens with issue date (iat) and some other attributes or
keeping session in ElastiCache for Redis or DynamoDB. I decided to go with the
last approach, where session details - such as version - will be stored in a
DynamoDB table and user will just send me a cookie with item's primary key. To
decrease latency, I will use DynamoDB Global Table and pick the nearest replica
in the Lambda function.
Also check out repository for this article
An example application
First we need some application that will be served by CloudFront but that will also generate some cookies. In this example we will use a simple FastAPI application combined with AWS SDK that will store sessions in DynamoDB. When the user enters the application they will be issued a session cookie for 10 minutes and with each refresh, the session will be updated in the table.
First let's create a simple FastAPI application that will just return an HTML
page with some CSS. config.py contains some values for the CSS and the
application version code that is critical to this task as it must be the same
as used by Lambda@Edge later.
# config.py
BACKGROUND_COLOR="#F0A5C1"
FONT_FAMILY="Times New Roman, Serif"
COLOR="#255"
VERSION_NAME="Version 1.0"
VERSION_CODE="1"
# index.py
from fastapi import FastAPI, Cookie, Response
from fastapi.responses import HTMLResponse
from typing import Annotated

import config

app = FastAPI()

@app.get("/", response_class=HTMLResponse)
async def root(response: Response, sessiontoken: Annotated[str | None, Cookie()] = None):

    return f"""
    <html>
        <head>
            <title>Application {config.VERSION_NAME}</title>
            <style>
                body {{
                    background-color: {config.BACKGROUND_COLOR};
                    color: {config.COLOR};
                    font-family: {config.FONT_FAMILY};
                }}
            </style>
            <meta http-equiv="Content-Type" content="text/html; charset=utf-8">
        </head>
        <body>
            <h1>This is application {config.VERSION_NAME}</h1>
            <p>You now got a cookie :)</p>
        </body>
    </html>
    """
For simplicity of development, I will create a Dockerfile that will embed our
application. We will use a build argument to reuse the same one for the next
version.
FROM python:3.11-alpine
RUN pip3 install "uvicorn[standard]" "fastapi" "boto3"

WORKDIR /app
ARG VERSION=version1
COPY app-$VERSION/* /app/

ENTRYPOINT [ "uvicorn", "index:app", "--host", "0.0.0.0" ]
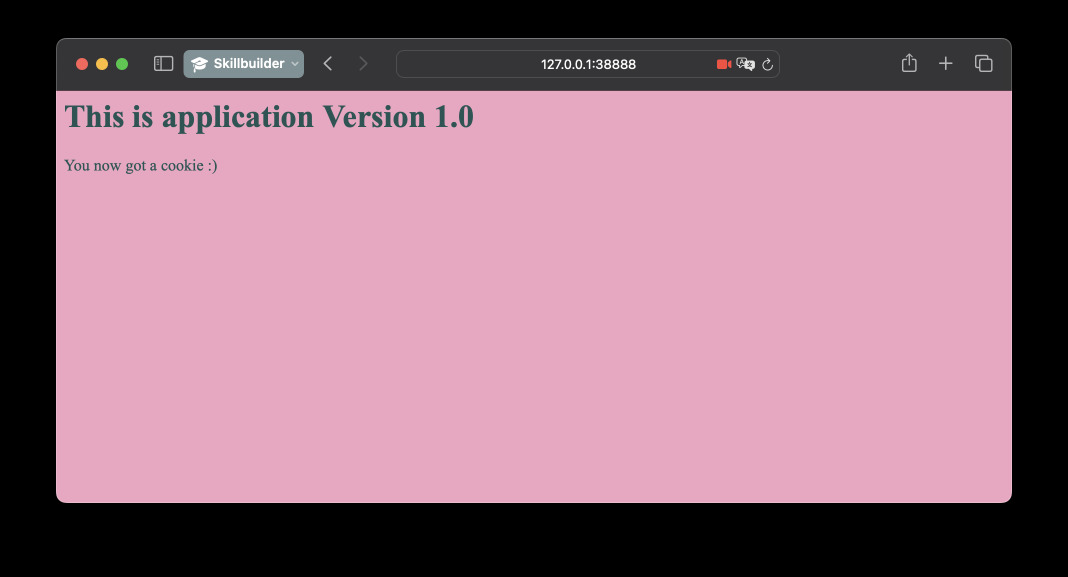
You can then build the image locally and run the application for testing. It is just serving a dummy HTML template. In the browser, navigate to localhost and the port you choose when running the container with Docker.
$ docker build -t ppabis/cf-lambda-origins:version1 .
$ docker run --rm -it -p 38888:8000 ppabis/cf-lambda-origins:version1
Creating sessions table
Now we will create a DynamoDB table that will hold sessions of our users. The table will have only three fields: token, version and expiration. The token will be the primary key, version will determine which version we want to stick to the user and expiration will be the time when the session will expire. We don't have to validate expiration on the application side for now, it is just for the sake keeping the table clean with TTL.
Let's fire up the editor and configure our Terraform module. We will use AWS
provider version 5.40.0 and Terraform 1.7.4 and these version will be used
throughout this whole project.
provider "aws" {
  region = "us-east-1"
}

terraform {
  required_providers {
    aws = {
      source  = "hashicorp/aws"
      version = ">= 5.40.0"
    }
  }
}
Next we will define our SessionsTable table. As previously mentioned, we will
enable TTL cleanup (that will remove expired sessions periodically) and set the
primary key to token. We will also make it a global table by adding
replicas - one for eu region and one for ap region. The original table
will reside in us-east-1 region. We cannot create version and expiration
fields yet, as the name suggests, DynamoDB is dynamic. We can in theory use one
of those fields as a sort key or define indexes. However, let's just assume that
in case version is not present, we will default to the first version. We will
also use PAY_PER_REQUEST billing mode so that we don't have to deal with
autoscaling, due to using a global table.
resource "aws_dynamodb_table" "sessions" {
  name           = "SessionsTable"
  billing_mode   = "PAY_PER_REQUEST"
  hash_key       = "token"

  attribute {
    name = "token"
    type = "S"
  }

  ttl {
    attribute_name = "expiration"
    enabled        = true
  }

  replica { region_name = "ap-southeast-1" }
  replica { region_name = "eu-west-1" }
}
Let's init Terraform and apply the infrastructure. We continue still with the first version of our application.
Adding sessions to the application
In the root() function there are already some hints how the session cookie
will look like. We just need to implement the logic that will generate and store
the session. We will use AWS SDK for Python, boto3, to store the session in
the newly created DynamoDB table. We will generate random token with that will
be the primary key. If update_item won't fail, we will set the cookie in the
response to user so that their browser can store it. If the cookie was given
previously to us with the request, we will just update the expiration time and
the version to the one assigned by the current origin processing the request.
from boto3 import client
from random import randbytes
from hashlib import sha1
from datetime import datetime
import os

if os.environ.get("AWS_REGION") is None:
  dynamo = client("dynamodb", region_name="us-east-1")
else:
  dynamo = client("dynamodb")

def update_session(response: Response, sessiontoken: Annotated[str | None, Cookie()] = None):
    # If there is no session token we pick a random one
    if sessiontoken is None:
        sessiontoken = sha1(randbytes(128)).hexdigest()
    # And we update the session token in the database. Update in DynamoDB works also for new items.
    dynamo.update_item(
        TableName="SessionsTable",
        Key={ "sessiontoken": {"S": sessiontoken} },
        UpdateExpression="SET expires = :expires, version = :version",
        ExpressionAttributeValues={
            ":expires": { "N": str(int(datetime.now().timestamp() + 600)) },
            ":version": { "S": config.VERSION_CODE }
        },
    )
    # We give the user either a new cookie or the same one as before
    response.set_cookie(key="sessiontoken", value=sessiontoken)
Now we only have to edit the root function to call the update_session
function with try and except blocks to handle the case when DynamoDB throws
an error such as no permissions.
@app.get("/", response_class=HTMLResponse)
async def root(response: Response, sessiontoken: Annotated[str | None, Cookie()] = None):
    try:
        update_session(response, sessiontoken)
    except Exception as e:
        print(e)
        response.status_code = 500
        return f"""<html><body><h1>ERROR 500</h1><p>We expected unexpected!</p></body></html>"""
    return f"""
    <html>
    ...
If we run the application on our local machine with Docker, we should get this 500 error unless we specified some credentials for AWS. Let's try.
docker build -t ppabis/cf-lambda-origins:latest .
docker run --rm -it -p 38888:8000 ppabis/cf-lambda-origins:latest

We can also verify that we are not receiving any cookies in case of an error. This will ensure that our application doesn't cause any unwanted behavior and errors are handled correctly (assuming 5xx is a correct way to handle it 😁).
$ curl -v http://localhost:38888
> GET / HTTP/1.1
>
< HTTP/1.1 500 Internal Server Error
< date: Sat, 09 Mar 2024 10:38:12 GMT
< server: uvicorn
< content-length: 74
< content-type: text/html; charset=utf-8
<
<html><body><h1>ERROR 500</h1><p>We expected unexpected!</p></body></html>
Hosting the application
Let's spin up some EC2 instance with Docker and host the application there. I
will use t4g.nano with Amazon Linux 2023. During the boot, user data will
install Docker for us. We will also define an IAM role that will allow the
instance to be accessed via SSM and read/write to DynamoDB table of our choice.
We will also open some HTTP port (such as 8080) in the security group so that
we can test our application.
For simplicity, I will not type the whole code for this instance here. Refer to the GitHub repository for complete solution.
data "aws_ssm_parameter" "AL2023" {
  name = "/aws/service/ami-amazon-linux-latest/al2023-ami-kernel-6.1-arm64"
}

resource "aws_instance" "AppInstance" {
  ami                    = data.aws_ssm_parameter.AL2023.value
  instance_type          = "t4g.nano"
  iam_instance_profile   = aws_iam_instance_profile.AppEC2Role.name
  vpc_security_group_ids = [aws_security_group.AppEC2.id]
  user_data              = <<-EOF
  #!/bin/bash
  yum install -y docker
  systemctl enable --now docker
  usermod -aG docker ec2-user
  EOF
  tags = {
    Name = "AppVersion1"
  }
}
After init and apply, you should find it in AWS console on the list of
instances. Right-click on it and select Connect. I will be connecting with
Session Manager but feel free to use your own method. After you log in run
docker version to verify that Docker was installed correctly. Now we have to
transfer our application to the instance. You can use scp if you SSH'd into it
but there are many ways you can deal with it: S3, vi, SSM parameters, etc. I
am old-school nerd and will use cat with <<EOF 🤓. With this method you have
to remember to escape $ with \$.
$ sudo su ec2-user
$ cd
$ cat <<EOF > index.py
from fastapi import FastAPI, Cookie, Response
# the file continues...
EOF
$ cat <<EOF > Dockerfile
FROM python:3.11-alpine
# the file continues...
COPY app-\$VERSION/* /app/
EOF
$ cat <<EOF > config.py
...
EOF
$ mkdir -p app-version1 && mv index.py app-version1/ && mv config.py app-version1/
Now it's time to build and run the application. If you use Session Manager,
switch to ec2-user with su. We will run the application exposed on port
which we set up in our security group to be accessible, in my case it is 8080.
$ docker build -t ppabis/cf-lambda-origins:latest .
$ docker run --rm -it -p 8080:8000 ppabis/cf-lambda-origins:latest
Now, don't disconnect from your SSH/SSM session. Open AWS console with EC2
instances in a new tab, and find the public IP. Go to the website
http://127.255.255.0:8080 (replace with IP of your instance) and you should
see the page. Open developer console (in Safari it is Option+Command+I) and go
to Network tab. It should show you that you got a cookie in the response.
Refresh and it you should send the cookie with the request and get the same in
response.
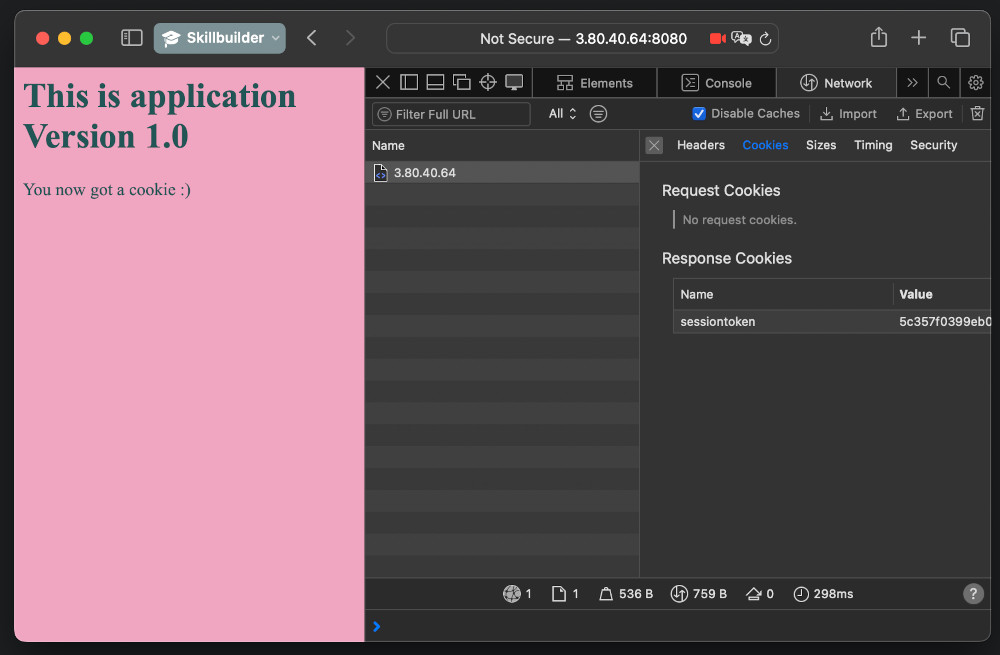

Remember first characters of the cookie. Go to DynamoDB in AWS console
(N. Virginia/us-east-1) and find the SessionsTable table. Click
Explore table items and look if you have the same cookie stored. If you see
it, that means we are successful in this part of the task. Switch to some other
region (such as Ireland/eu-west-1) and look if the table is also there.
Explore the items. It should be replicated.

Now hit Ctrl+C in the terminal where you run the application. Run the Docker
container in the background with -d flag. We will not remove the container and
name it appropriately so that we can read its logs in case of issues. Also we
set the policy to restart always so that the container will start after the
failure.
docker run -d --name "app_v1" -p 8080:8000 --restart always ppabis/cf-lambda-origins:latest
Now you can disconnect from this instance. We will continue the next part with updated application version hosted on another instance.
New application version
Go back to the Terraform file defining the instance. Add count = 2 so that two
instances are created in total. Also update the tags to reflect this change.
This instance will be clone of the first one but we will deploy a different app
version there.
resource "aws_instance" "AppInstance" {
  ami                    = data.aws_ssm_parameter.AL2023.value
  ...
  tags = {
    Name = "AppVersion${count.index + 1}"
  }
}
Apply this change. Terraform should only create one instance and move the
current one into index 0 but if it doesn't happen, you need to repeat
previous steps or import the instance with terraform import before hitting
apply.
Let's change the app for the second version. Copy over both files from
app-version1 to app-version2 directory. We will only modify many parameters
in config.py to distinguish between the two applications.
BACKGROUND_COLOR="#08122C"
FONT_FAMILY="Calibri, Helvetica, Sans-Serif"
COLOR="#E8C2C8"
VERSION_NAME="Version 2.0"
VERSION_CODE="2"
Copy over the files to the instance using your preferred method. I will use
cat again. Next build the Docker image with extra argument that will specify
the new version. Execute the container in the background the same was as before.
$ docker build -t ppabis/cf-lambda-origins:2.0 --build-arg VERSION=version2 .
$ docker run -d --name "app_v2" -p 8080:8000 --restart always ppabis/cf-lambda-origins:2.0
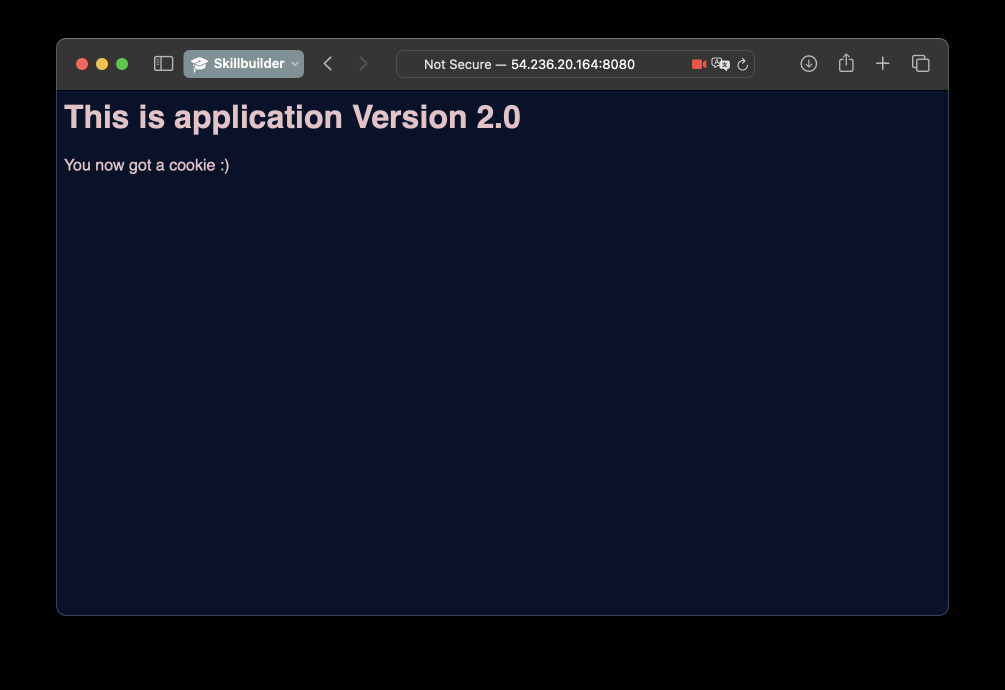
Go to AWS console. Get the public IP of the new instance. Go to the address in
your browser. You should get a newer version of the app. Let's also explore the
SessionsTable in DynamoDB to check if the new sessions are created with
correct version number.

Putting application behind CloudFront
We have currently two versions of the application. In the question we were told that in the current state, only the first version of the application is served by CloudFront. So lets create a CloudFront distribution that will have just one origin for now, we will figure out the rest later.
We will need the DNS name of the EC2 instance to specify as CloudFront origin.
There are many ways to get it, not necessarily copy and paste from the console
😉. If we composed previous Terraform directories as modules into one project we
could use outputs and variables. But I will use the data source in this
example.
data "aws_instance" "AppInstanceV1" {
  instance_tags = { Name = "AppVersion1" }
}

resource "aws_cloudfront_distribution" "AppDistribution" {
  default_cache_behavior {
    allowed_methods        = ["GET", "HEAD", "OPTIONS"]
    cached_methods         = ["GET", "HEAD"]
    target_origin_id       = "AppVersion1"
    viewer_protocol_policy = "redirect-to-https"
    forwarded_values {
      query_string = true
      cookies { forward = "all" }
    }
  }

  viewer_certificate {
    cloudfront_default_certificate = true
    minimum_protocol_version       = "TLSv1.2_2019"
  }

  restrictions {
    geo_restriction { restriction_type = "none" }
  }

  enabled = true

  origin {
    custom_origin_config {
      http_port              = 8080
      https_port             = 443
      origin_protocol_policy = "http-only"
      origin_ssl_protocols   = ["TLSv1.2"]
    }
    domain_name = data.aws_instance.AppInstanceV1.public_dns
    origin_id   = "AppVersion1"
  }
}

output "CloudFrontDNS" {
  value = aws_cloudfront_distribution.AppDistribution.domain_name
}
Apply might take time. The distribution above will have the following behavior:
- It will accept
GET,HEADandOPTIONSrequests, - Not cache anything, forward everything to the origin,
- Redirect to HTTPS,
- Use default SSL certificate provided by
cloudfront.net, - Forward all traffic to our custom origin at port
8080.
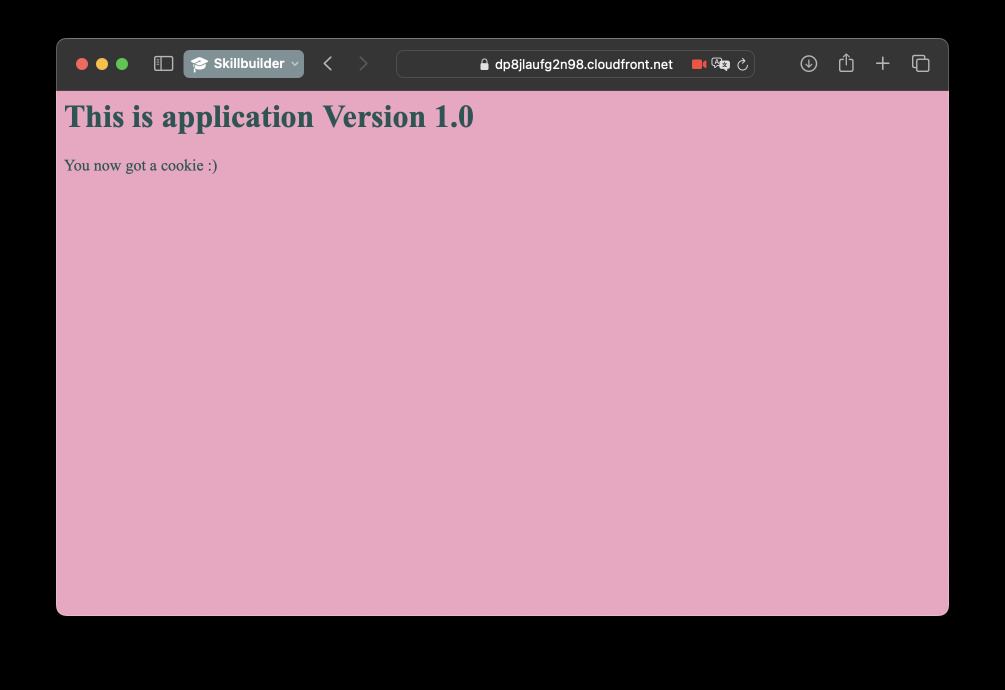
After CloudFront distribution is created, you can get the domain name for it from the AWS console or with Terraform outputs. Go to the address in your browser. You should be connected to the instance via HTTPS (or to CloudFront at least).
Creating Lambda@Edge function
Now it's time to finally add some routing logic to our solution. We will create
a Lambda function in us-east-1 region in Python. The function will be
triggered by CloudFront on the origin request event. It will contact the nearest
DynamoDB Table based on current execution region (Lambda@Edge is distributed
into multiple locations) and check if the user has a valid cookie that points to
a valid application version. The function will then change origin if needed. It
would be nice to store the second origin in environment variables but it's not
possible for Lambda@Edge. For simplicity let's just hardcode the values.
For convenience of development we will include hashicorp/archive provider to
create ZIP files. Add this to your main.tf file or any other file you use for
storing the providers. Run terraform init afterwards.
terraform {
  required_providers {
    ...
    archive = {
      source  = "hashicorp/archive"
      version = ">= 2.0.0"
    }
  }
}
Let's start with the Lambda function code in Python. I will use the draft from
AWS docs.
The function we will define will first select which DynamoDB to use based on its
execution region. We defined replicas only for eu-west-1 and ap-southeast-1
so for all other continents we will just default to us-east-1.
import boto3, os

# To reduce latency, we will pick one of the tables based on the region
aws_region = os.environ.get("AWS_REGION")
aws_region = "us-east-1" if aws_region is None else aws_region
if aws_region.startswith("eu-"):
    aws_region = "eu-west-1"
elif aws_region.startswith("ap-"):
    aws_region = "ap-southeast-1"

dynamo = boto3.client("dynamodb", region_name=aws_region)
Next we will create two functions: one for determining the version based on the session token. It will contact DynamoDB to get the details of the session. If session doesn't contain version or there's no session cookie, we will just select random origin with 50/50 chance. Provide the second origin's DNS address in your the function.
import random
second_origin = "ec2-127-128-20-164.compute-1.amazonaws.com" # Get DNS address of your own secondary instance

def pick_random(request):
    # If we rolled heads, change the origin
    if random.choice([0, 1]) == 0:
        request['origin']['custom']['domainName'] = second_origin
    # Else just return the request unchanged
    return request

def select_version(token, request):
    item = dynamo.get_item(
        TableName="SessionsTable",
        Key={ "token": {"S": token} }
    )
    # If this token is found in the table and this session has a version, we stick to it
    if 'Item' in item and 'version' in item['Item']:
        if item['Item']['version']['S'] == "2":
            request['origin']['custom']['domainName'] = second_origin
    # Session might be invalid so roll any origin 50/50
    else:
        request = pick_random(request)

    return request
The last part is to define the handler that will process CloudFront request. Here we need to extract cookies from the request's header, look for the session token cookie (if it exists) and call the appropriate function.
def handler(event, context):
    token = None
    request = event['Records'][0]['cf']['request']
    headers = request['headers']

    # Check if there is any cookie header
    cookie = headers.get('cookie', [])
    if cookie:
        for c in cookie:
            # Check if there is a sessiontoken
            if 'sessiontoken' in c['value']:
                token = c['value'].split('=')[1]
                break

    if token:
        request = select_version(token, request)
    else:
        # As with invalid session case, we roll any origin 50/50
        request = pick_random(request)

    return request
Now we will define IAM policies for the function. We will need the Lambda to be
executable by CloudFront and to be able to read from DynamoDB. The role must be
assumable by both lambda.amazonaws.com and edgelambda.amazonaws.com. We will
just give it permissions to read from the table.
resource "aws_iam_role" "OriginSelectionLambdaRole" {
  name = "OriginSelectionLambdaRole"
  assume_role_policy = jsonencode({
    Version = "2012-10-17",
    Statement = [ {
      Action = "sts:AssumeRole",
      Effect = "Allow",
      Principal = {
        Service = [
          "lambda.amazonaws.com",
          "edgelambda.amazonaws.com"
        ]
      }
    } ]
  })
}

data "aws_iam_policy_document" "DynamoDBSessionsTable" {
  statement {
    actions   = [ "dynamodb:GetItem" ]
    resources = [ "arn:aws:dynamodb:*:*:table/SessionsTable" ]
  }
}

resource "aws_iam_role_policy" "DynamoDBRead" {
  name   = "DynamoDBRead"
  role   = aws_iam_role.OriginSelectionLambdaRole.id
  policy = data.aws_iam_policy_document.DynamoDBSessionsTable.json
}
As stated before, we can utilize Hashicorp's archive provider to create a ZIP
file that is needed for deploying the Lambda function. It also handles
generation of the hash for the file in required format. We will also use
publish = true so that applying the infrastructure will generate actual
version of the function as we cannot use $LATEST for CloudFront.
data "archive_file" "lambda" {
  type        = "zip"
  source_file = "${path.module}/origin_selector.py"
  output_path = "${path.module}/origin_selector.zip"
}

resource "aws_lambda_function" "OriginSelector" {
  filename         = data.archive_file.lambda.output_path
  function_name    = "OriginSelector"
  role             = aws_iam_role.OriginSelectionLambdaRole.arn
  handler          = "origin_selector.handler"
  runtime          = "python3.11"
  source_code_hash = data.archive_file.lambda.output_base64sha256
  publish          = true
}
Before we attach the function to CloudFront, let's test it in AWS console. Go to
Lambda service, enter the function and select Test tab. Create a new test
event. Use JSON from
this page.
You can modify request headers. I added the sessiontoken cookie as the second
cookie to test the function completely. You can also remove it to see if it
keeps the origin the same as in the test event.
//...
            ],
            "cookie": [
             {
                 "key": "Cookie",
                 "value": "tracking=123456"
             },
             {
                 "key": "Cookie",
                 "value": "sessiontoken=472ed977dc2fd2700dbb03a58634f789fd58d911"
             }
            ],
            "user-agent": [
//...
I inserted actual working token from the DynamoDB table with version 2 to see if
the origin changes from example.org to the one specified in the function.
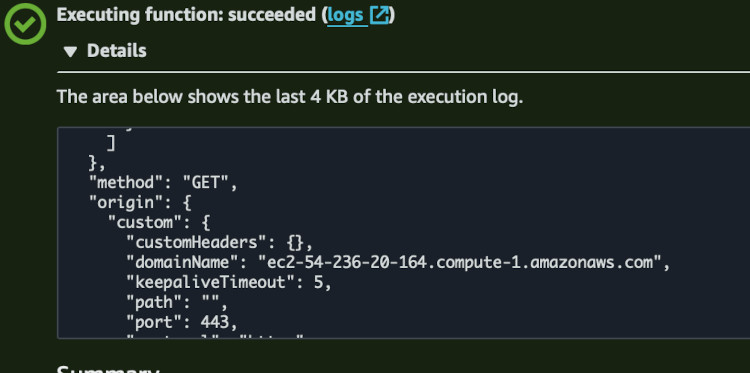
Everything seems to be working. Now we can attach the function to CloudFront.
Go back to its resource, to the default cache behavior block. Add the Lambda
function for origin request. Also pick the appropriate version in the ARN. If
you deployed the working function successfully the first time, it will be 1.
Otherwise browse Versions tab in the Lambda function in AWS console and choose
the latest one.
resource "aws_cloudfront_distribution" "AppDistribution" {
  default_cache_behavior {
    lambda_function_association {
      event_type   = "origin-request"
      lambda_arn   = "${data.aws_lambda_function.origin_request.arn}:1"
      include_body = false
    }
  ...
}
After applying the change, you can try opening and closing a private window in
the browser and navigating to the page multiple times or clearing the cookies.
You can also use this curl almost-one-liner. It should show you how the
versions of the app switch with each request without a cookie - so choosing a
random origin.
for i in {1..20}; do
  curl -s https://$(terraform output -raw CloudFrontDNS) | grep "Version"
  sleep 3
done
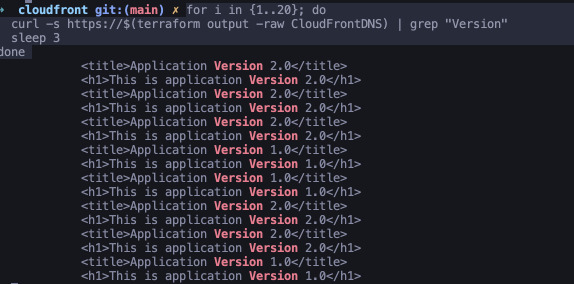
Once you visit the website with a browser, you should stay on the same page no matter how many times you refresh it, even with cache disabled.
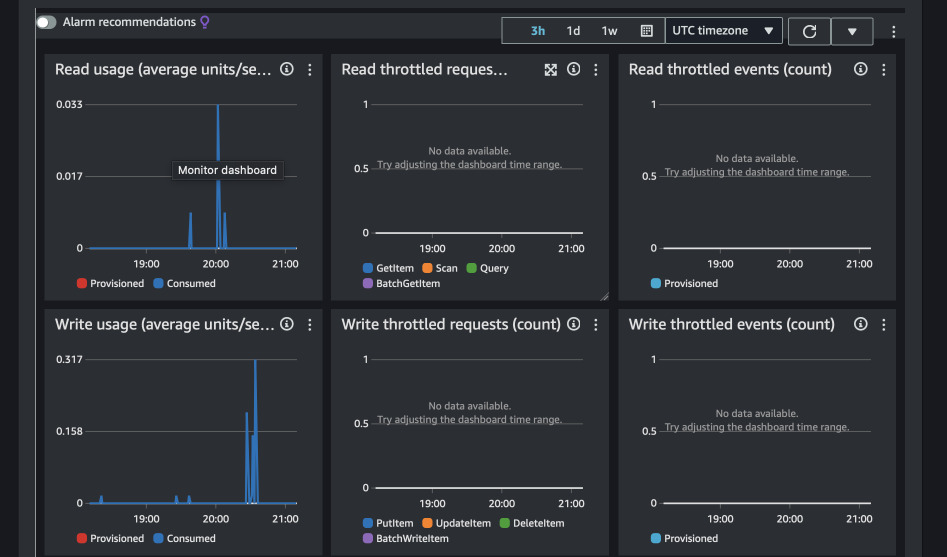
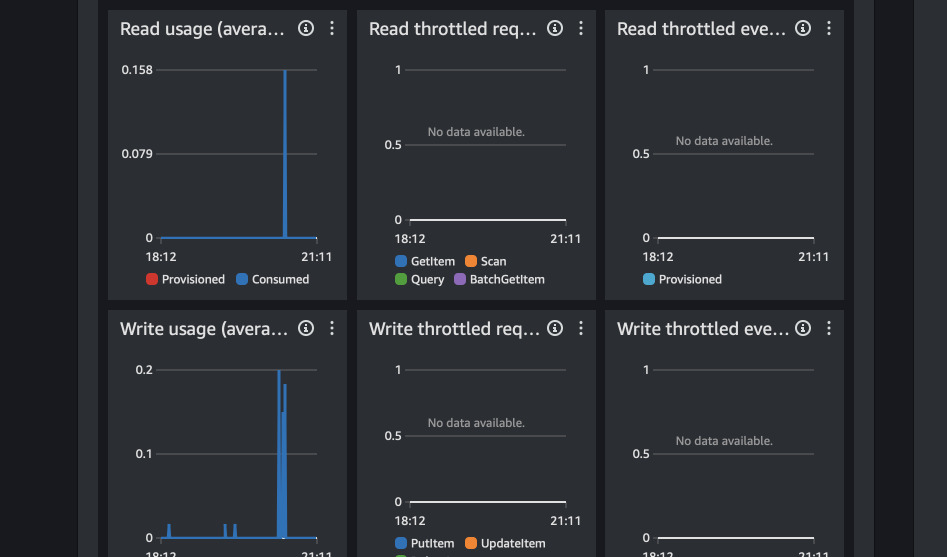
Is the table really global?
Observe activity in DynamoDB. The apps use only us-east-1 table. However, I am
based in Europe so I expect Lambda@Edge to use eu-west-1 table. You can try
reaching via VPN or make SSH tunnel via AWS to change region too. The charts
below show usage for both us-east-1 and eu-west-1 tables.