NAT Instance on AWS - Update with Amazon Linux 2023 (ft CodeBuild and Terratest)
1 March 2024
In one previous posts I wrote how to create a NAT instance on AWS to save on NAT
Gateway costs. However, there were two issues with that solution: it worked only
for one subnet, it didn't work on Amazon Linux 2023 and it didn't save the
state permanently (reboot makes it a normal instance). However, over time I
found solutions to those problems as I needed it. Today, I want to update on the
previous post
with new hints on how to tackle the problems. The repository for the new
solution remains the same. It is just
tagged v2.0.4.
Problem with only one subnet
I asked for help on AWS re:Post. Gary, an Expert in the AWS Community, gave me straight answer: I didn't have the routes! The NAT instance had no idea how to route packets that were coming back destinied for the instances in the other subnet.
To support more subnets, I wrote a template loop in Terraform in user data.
resource "aws_instance" "nat-instance" {
  #...
  user_data = <<-EOF
  #!/bin/bash
  sysctl -w net.ipv4.ip_forward=1
  # ...
  %{for cidr in setsubtract(data.aws_subnet.private[*].cidr_block, [data.aws_subnet.private[0].cidr_block])~}
  echo "${cidr}\
   via ${cidrhost(data.aws_subnet.private[0].cidr_block, 1)}\
   dev eth1" >> /etc/sysconfig/network-scripts/route-eth1
  %{~endfor}
  systemctl restart network
  EOF
}
The loop above creates routes for all the subnets in the list except for the first one - we assume that the first one is the one where the NAT instance is so creating route again would be redundant.
Saving the state and restoring on boot
The function above already saves the routes as a script that will be picked up
on startup. However, changes to iptables are not permanent. We can use a package
that will do this for us. This is the job for iptables-services package.
Also we can store IP forwarding in the sysctl config. We will just write the
line to /etc/sysctl.conf, reload the values.
resource "aws_instance" "nat-instance" {
  # ...
  user_data = <<-EOF
  #!/bin/bash
  echo "net.ipv4.ip_forward=1" >> /etc/sysctl.conf
  sysctl --system
  yum install iptables-services -y
  iptables -t nat -A POSTROUTING -o eth0 -j MASQUERADE
  iptables -A FORWARD -i eth0 -o eth1 -m state --state RELATED,ESTABLISHED -j ACCEPT
  iptables -A FORWARD -i eth1 -o eth0 -j ACCEPT
  systemctl enable iptables
  service iptables save
  # ...
  EOF
}
Amazon Linux 2023
Everything works fine so far on Amazon Linux 2. However, what if we wanted to go
modern and update the instance to latest Amazon Linux 2023? The problem is
larger than it seems. The OS now uses systemd-networkd and does not support
legacy network-scripts. Also the network card names are changed dynamically on
boot and are not guaranteed (although altnames are provided). What is more, when
we use Terraform, the secondary interface is attached after the instance is up.
User data might have already been executed by that time. We need to consider all
these facts when writing the script.
New user data script
We will go through the new user data script for Amazon Linux 2023 step by step.
First we will do the easiest part: install iptables-services and store the
IP forwarding config in sysctl (this time in a directory).
yum install iptables-services -y
echo "net.ipv4.ip_forward=1" >> /etc/sysctl.d/90-nat.conf
sysctl --system
Our next task is to wait for the "eth1" interface to appear. I assumed that it
won't take more than 30 seconds and checked every 3 seconds. The script below
waits for the interface aliased device-number-1 to appear. The naming is
handled by
amazon-ec2-net-utils. In
general this network interface will be named ens6 but we cannot assume it.
ITERATIONS=10
ETH1=""
# Wait for "eth1" to be detected by kernel and get its real name
while [ -z $ETH1 ] && [ $ITERATIONS -gt 0 ]; do
  sleep 3
  # device-number-1 is secondary interface as specified by device_index = 1
  ETH1=$(ip -4 addr show device-number-1 | grep -oP 'ens[0-9]+' | head -n1)
  ITERATIONS=$((ITERATIONS-1))
done
Next we will pick another ens network interface. My script assumes that our
instance has only two network cards and secondary is used as the private
facing. If you happen to have more, be sure which one is used for DMZ and which
for protected instances.
# Select public interface that is not "eth1"
ETH0=$(ip -4 addr show device-number-0 | grep -oP 'ens[0-9]+' | head -n1)
Now it is time to configure iptables. We will use the determined interface names
for that. We could technically use altnames but the data stored by
amazon-ec2-net-utils is kept in /run and is not persistent so we can't
assume that the names will be determined until the time iptables are restored.
(On the other hand, interface names can't even be guaranteed).
iptables -t nat -A POSTROUTING -o $ETH0 -j MASQUERADE
iptables -A FORWARD -i $ETH0 -o $ETH1 -m state --state RELATED,ESTABLISHED -j ACCEPT
iptables -A FORWARD -i $ETH1 -o $ETH0 -j ACCEPT
systemctl enable iptables
service iptables save
The last thing we need to do is to create routes for all the subnets except for
the primary. We will use the same loop as before but this time we can make it
cleaner as this file will be just a template - we don't need to give actual
Terraform addresses yet. The script will make Destination for each private
CIDR. Gateway in AWS is always the .1 address of the subnet (router).
# We make these routes for the secondary interface
mkdir -p /etc/systemd/network/70-$ETH1.network.d
# private_subnets is a list of all the subnets, primary_subnet is the CIDR of
# of private subnet where the NAT instance is.
%{for cidr in setsubtract(private_subnets, [primary_subnet])~}
echo "[Route]" >> /etc/systemd/network/70-$ETH1.network.d/routes.conf
echo "Destination=${cidr}" >> /etc/systemd/network/70-$ETH1.network.d/routes.conf
echo "Gateway=${cidrhost(primary_subnet, 1)}" >> /etc/systemd/network/70-$ETH1.network.d/routes.conf
echo "GatewayOnlink=yes" >> /etc/systemd/network/70-$ETH1.network.d/routes.conf
%{~endfor}
# Reload all the new configuration
networkctl reload
Now we can insert all the values into the template in our user data script. The notation here is different as the NAT instance is a separate module now. You only need to provide subnets, VPC and route tables IDs.
resource "aws_instance" "nat_instance" {
  # ...
  user_data = templatefile("${path.module}/user_data.sh", {
    private_subnets : data.aws_subnet.private[*].cidr_block,
    primary_subnet : data.aws_subnet.private[0].cidr_block
  })
}
Elastic IP needed?
The last thing that I would like to mention is that the new NAT instance should
have an Elastic IP. This is a weird behaviour of AWS that instances that have
more than one network card, even if they are created with
associate_public_ip_address and in a subnet with map_public_ip_on_launch, it
will not attach any public IP to any of the network interfaces - but only if you
stop and start the instance. Reboots keep the public IP. But sometimes instances
on AWS just break requiring you to recover them using stop and start method.
When I converted the old NAT instance into a module, I tried providing elastic IP in one shot but Terraform couldn't figure out the graph for this. So I embedded it into the module and created boolean variable if you want elastic IP or not.
resource "aws_eip" "public_ip" {
  count    = var.elastic_ip ? 1 : 0
  instance = aws_instance.nat_instance.id
}
Using the module
Here's a sample usage of the module.
module "nat" {
  source         = "git::github.com/ppabis/nat-instance.git//NAT?ref=v2.0.4"
  vpc            = aws_vpc.my-vpc.id
  public_subnet  = aws_subnet.public-subnet.id
  private_subnet = aws_subnet.private-subnet[*].id              # All the private subnets
  route_tables   = [aws_route_table.private-rtb.id]             # Route table of private subnets
  iam_profile    = aws_iam_instance_profile.ssm-profile.name    # For debugging
  elastic_ip     = true
}
In order to allow your private instances to use the NAT instance, you need
either attach the security group from the outputs (unless you provided own) or
fill additional_sg and additional_cidr variables.
Testing
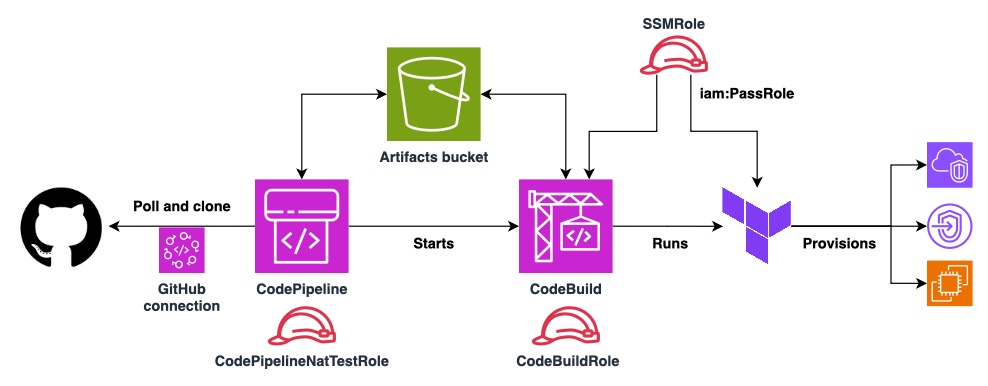
Not only I decided to test this module manually but also created a script for it. Just as in the example repository, the script creates a VPC, subnets, route tables, some private instances and the star of the show - NAT instance. There are many tools that can be used for the job whether it is GitHub Actions, GitLab CI or even Jenkins. However, I didn't want to install anything or provide AWS credentials to external services. Also DevOps Professional is still pending so the choice is clear: CodeBuild. And as always, I will implement it in Terraform.
Choosing the Go image with Terratest seems like a viable option. I also have to somehow run the CodeBuild job on push, so I decided to go with CodePipeline and connect it to the GitHub repository. I would be nice on AWS side if they allowed anonymous repository access, just using public HTTPS link. But as of now, it is not supported. (It is possible to clone any repository in CodeBuild but it is not the same as starting CodePipeline on push).
I would like the testing to be a more thorough:
- I will create two private route tables and three subnets, to see if the loops for adding multiple routes both inside the instance and in route tables work,
- one instance will have the security group that the NAT module creates and outputs to see if the traffic is permitted from there,
- one instance will be allowed to the NAT instance by CIDR, to test allow from a CIDR block,
- one instance will be allowed to the NAT instance by its own security group, to check if allow from another security group works.
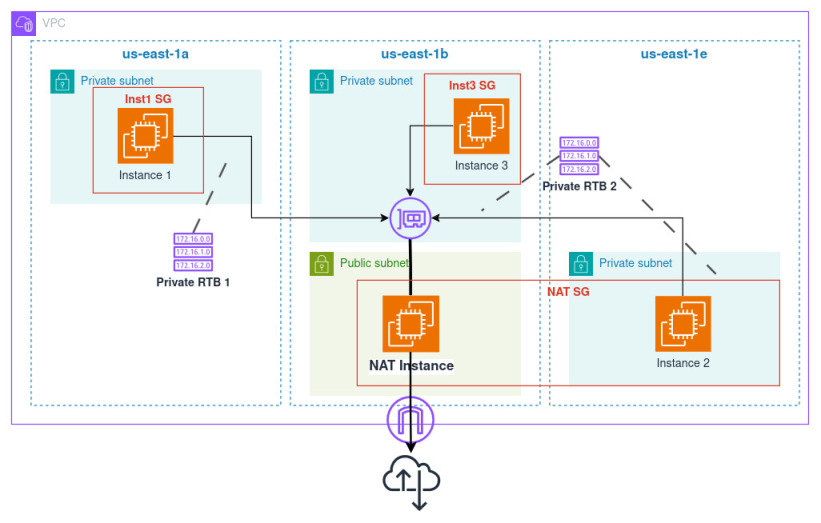
I refactored the repository to have VPC in a separate module with the diagram.
Terratest
I will use this Go testing framework to apply Terraform infrastructure and tear
it down afterwards. In test/nat_test.go I created a very simple script - just
create and destroy the infrastructure.
package test

import (
    "testing"
    "github.com/gruntwork-io/terratest/modules/terraform"
)

func TestNatInstance(t *testing.T) {
    t.Parallel()

    terraformOptions := terraform.WithDefaultRetryableErrors(t, &terraform.Options{
        TerraformDir: "..",             // Parent directory
        NoColor: true,
        Vars: map[string]interface{}{
            "region": "us-west-2",      // Anything you like
        },
    })

    defer terraform.Destroy(t, terraformOptions)
    terraform.InitAndApply(t, terraformOptions)
}
Next I ran go mod init "github.com/ppabis/nat-instance" and go mod tidy in
the root of the repository. This creates go.mod file that is useful to keep
all the needed dependencies in one place. For each build, it is needed to run
go mod download to download all the dependencies. This leads us to the next
step: creating a buildspec.yml file for CodeBuild.
Buildspec for CodeBuild
Buildspec is a file that controls the CodeBuild environment and build steps. We
need to ask it to install Go (from the
list of supported runtimes
per each image). We also have to install Terraform. Fortunately, we have root
access and can just use yum to install it without any hassle.
Next steps are just repeating the steps from the Terratest script and deleting
tfstate at the end just in case.
version: 0.2

phases:
  install:
    runtime-versions:
      golang: 1.20
  pre_build:
    # Install Terraform
    commands:
      - yum install -y yum-utils
      - yum-config-manager --add-repo https://rpm.releases.hashicorp.com/AmazonLinux/hashicorp.repo
      - yum -y install terraform
  build:
    commands:
      - go mod download && go mod tidy
      - cd test
      - go test -v -timeout 30m
      - cd ..
  post_build:
    commands:
      - rm -f terraform.tfstate
      - rm -f terraform.tfstate.*
CodePipeline and CodeBuild
Now as we have the buildspec with all the commands that are needed to run the
test, we can build the actual CodePipeline infrastructure. In the repository I
created a new
directory called TestPipeline.
It is a separate Terraform module but it must not be imported by the actual
system under test. It is there only for reference. To deploy this infrastructure
just cd into this directory and run terraform init and apply. I won't
describe all the details in here but some significant parts.
S3 bucket for artifacts
CodePipeline requires us to define an S3 bucket for artifacts. It can be the
default one but it's better to have control over it. I just named it
codepipeline-nat-test-... with a random string at the end to avoid collisions.
IAM SSM role
This is a role that will be passed to the infrastructure of NAT instance and other instances we test to avoid giving permissions to CodeBuild to create IAM policies and roles, rather just pass them, which is more secure. This SSM role will allow us later to perform Run Command from SSM via the provided VPC endpoints - which is defined in the VPC module. This setup allows to communicate with the instances or debug them even if the NAT instance fails to provide Internet connectivity.
IAM roles for CodePipeline and CodeBuild
CodePipelineNatTestRole is a role needed only for CodePipeline to be able to
read and write artifacts from and to S3 bucket mentioned earlier and to control
CodeBuild jobs. It also permits to use the GitHub connection to clone the
repository and react to pushes - more on that later.
CodeBuildRole permits more actions than the previous role. Not only it can
read and write to the S3 bucket or store CloudWatch logs, but it has full
permissions over EC2, VPC and SSM. These are all the permissions that Terraform
will need to provision and destroy the tested infrastructure. It also has
iam:PassRole for SSM role mentioned earlier.
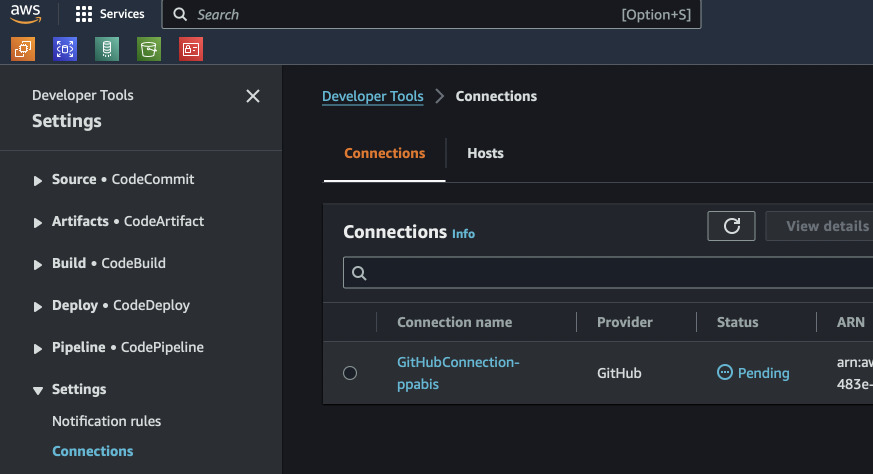
Connection to GitHub
This step is not so straightforwards as it requires manual clicks in AWS Console
and GitHub. After applying CodePipeline infrastructure, we cannot yet clone
anything from out GitHub. We need to first go to AWS Console and authorize AWS
to access our GitHub account. In AWS Console search for CodePipeline and on
the left look for Settings -> Connections. There should be one connection
pending. Select the radio button next to it and Update pending connection.
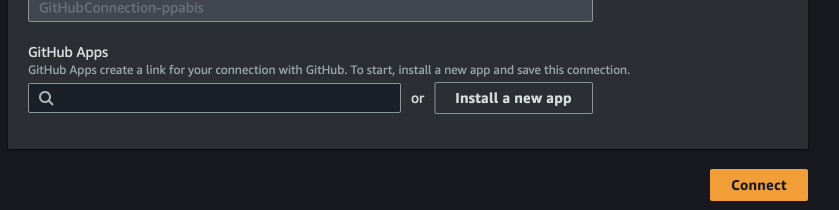
Now authorize to GitHub for the first time. Afterwards, Install a new app and
pick on GitHub repos you want to share with AWS. When you see a generated app
number, click Connect to finish.
CodeBuild project
CodeBuild project contains two stages: Source and Test. The first one is
just copies the source over from artifacts created by CodePipeline. The other
starts the actual job. It is important to set correct settings here. I chose ARM
architecture on Graviton because they are slightly cheaper than x86. Surely for
Terraform we don't need too much CPU or memory so pick the smallest instance.
  compute_type = "BUILD_GENERAL1_SMALL"
  image        = "aws/codebuild/amazonlinux2-aarch64-standard:3.0"
  type         = "ARM_CONTAINER"
I also specified environment variable TESTING_SSM_ROLE with the name of the
role that should be passed to newly created instances by Terraform. We will also
store logs of each execution in CloudWatch Logs to browse them if needed.
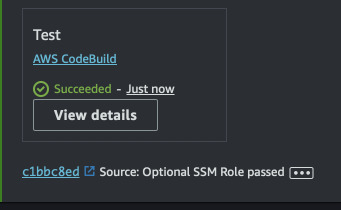
Testing first run
I had some bugs at first regarding the permissions (tried to create SSM role
instead of passing) and VPC endpoints being hardcoded to eu-central-1 region.
After fixing both of the issues, the pipeline worked - Terraform built and
destroy the infrastructure. The logs confirm this by looking both at the output
of go test as well as Terraform log showing plan for apply and destroy.
Now, we can test if the Terraform code is correct. But this is not the end. We did not evaluate anyhow if the NAT is working and all the subnets and route tables are correctly configured. Remember, we created IAM role for the instances so that it can access Systems Manager (SSM). The endpoints in the testing VPC module allow it the instances to communicate with SSM even when the NAT is down. So our best bet is to use Run Command from Systems Manager.
SSM Document and Run Command
First we need to define a document that SSM will use for executing the command.
Our will have a very simple syntax and will just call curl and compare the
results with the NAT instance's public IP.
---
schemaVersion: '2.2'
description: Test connectivity to the outside world using curl
parameters:
  expectedIp:
    type: String
    default: ""
    description: (Optional) The expected IP address to compare against the actual IP address
mainSteps:
- action: aws:runShellScript
  name: runCurlConnectivityTest
  inputs:
    runCommand:
    - OUT_IP=$(curl -sS --max-time 10 https://api.ipify.org)
    - if [ -z "$OUT_IP" ]; then echo "Failed to get external IP"; exit 1; fi
    - 'if [ -n "{{ expectedIp }}" ] && [ "$OUT_IP" != "{{ expectedIp }}" ]; then echo "Expected IP: {{ expectedIp }}, Actual IP: $OUT_IP"; exit 1; fi'
    - echo "External IP is $OUT_IP == {{ expectedIp }}"
The document above contains a single optional parameter expectedIp where we
will put the public IP of the NAT instance. The script works also without it but
it doesn't verify what connection the instance is using to access the Internet.
For testing, we will use https://ipify.org service. It just responds with our
public IP in plain text. Our cURL command will include timeout of 10 seconds so
that we don't wait minutes for the failure. First if checks if we got any
response from api.ipify.org. Second if checks if the IP we got is equal to
NAT IP but only if it was provided. Otherwise the test passes (there's no
exit 1 anywhere).
Systems Manager Run Command is a great solution for us because it allows to just
specify instances by tag to run the command massively. Fortunately, in the test
infrastructure code I tagged all the private instances with Project=NAT-Test.
We can't use Terratest for this because it can only execute documents on
specific instances. We will just use plan AWS SDK for Go. So below the
InitAndApply I waited for the instances to become registered in SSM and then
ran the command (a separate function for that to make the code cleaner).
You can find runTestDocument in this file:
test/run_test_command.go.
func TestNatInstance(t *testing.T) {
    t.Parallel()
  ...
  terraform.InitAndApply(t, terraformOptions)

    // Wait until all instances are registered in the inventory
    instanceIdsString := terraform.OutputList(t, terraformOptions, "test-instances-ids")
    for _, instanceId := range instanceIdsString {
        aws.WaitForSsmInstance(t, region, instanceId, 2*time.Minute)
    }

    ssmClient := aws.NewSsmClient(t, region)
    publicIp := terraform.Output(t, terraformOptions, "public-ip")
    err := runTestDocument(t, ssmClient, "TestInternetConnectivity", publicIp)
    if err != nil {
        t.Log(err)
        t.Fail()
}
I first tested the setup locally, just using go test and also typed a fake IP
into the publicIp variable to test failing. Both pass and fail worked so I
pushed the changes to the repository and waited for the pipeline to finish.

The concluding part
The cool things would be to have a build badge. However, this is only supported by standalone CodeBuild projects, not by CodePipeline. It would be possible to create another step that could generate one based on the results of the previous step.