Athena Workgroups and Lake Formation
13 January 2024
In this post I would like to explore the possibilities of Athena Workgroups and Lake Formation to control costs and access to data in S3. We will implement a limit on the amount of data scanned by Athena and hide some columns and rows from the user via Lake Formation and Glue Data Catalog.

Creating a bucket for data to process
If you don't have yet a bucket that you can use for storing data for querying with Athena, just define one like below. Otherwise you can define a data source with the name of this bucket - this will ensure that the bucket exists and you have at least read permissions on it from Terraform side.
resource "aws_s3_bucket" "data-source" {
    bucket = "data-source-202401876" // Or specify some random value
}
We need to refer to this bucket in IAM policies or apply a bucket policy on it so that new role can access it. I will use the former in later section but it's up to your taste.
Creating a limited workgroup
We will now define a new workgroup for Athena in our account. We will limit the workgroup to 20 MB of data scanned per query. This new workgroup will store the results in its own S3 bucket. It will be accessible by our new role for testing.
resource "aws_s3_bucket" "athena" {
    bucket = "athena-results-202401999" // Or specify some random value
}

resource "aws_athena_workgroup" "limited-wg" {
  name = "limited-wg"
  configuration {
    enforce_workgroup_configuration = true
    publish_cloudwatch_metrics_enabled = true
    bytes_scanned_cutoff_per_query = 1024 * 1024 * 20
    result_configuration {
      output_location = "s3://${aws_s3_bucket.athena.id}/limited-wg/"
    }
  }
}
Role for testing
If you are using an administrator account or a root account (hopefully the former), the user can actually select any workgroup so the test won't be too measurable. We can create a role in IAM that will be assumable by our user and which will have limited access - just to this new Athena workgroup and required S3 permissions but full Glue access for simplicity.
data "aws_caller_identity" "current" {}

resource "aws_iam_role" "AthenaWorkgroupUserRole" {
  name = "AthenaWorkgroupUserRole"
  assume_role_policy = jsonencode({
    Version = "2012-10-17"
    Statement = [ {
        Action = "sts:AssumeRole"
        Effect = "Allow"
        Principal = { AWS = data.aws_caller_identity.current.arn }
      } ]
  })
}
Now we will create a policy that will allow the user to access the workgroup only, but also required S3 and Glue permissions. I suggest doing it in a separate file or even JSON loaded from Terraform as it might be quite long. We will put everything into one policy document for simplicity.
data "aws_iam_policy_document" "AthenaWorkgroupPermissions" {
    statement {
        // Prevent user from creating or editing workgroups
        effect = "Deny"
        actions = [
            "athena:DeleteWorkGroup",
            "athena:UpdateWorkGroup",
            "athena:CreateWorkGroup"
        ]
        resources = ["*"]
    }

    statement {
        effect = "Allow"
        actions = [
            "athena:ListEngineVersions",
            "athena:ListWorkGroups",
            "athena:ListDataCatalogs",
            "athena:ListDatabases",
            "athena:ListTableMetadata",
            "athena:GetTableMetadata"
        ]
        resources = ["*"]
    }

    statement {
        effect = "Allow"
        actions = [
            "athena:GetWorkGroup",
            "athena:GetQueryResults",
            "athena:GetNamedQuery",
            "athena:GetQueryExecution",
            "athena:GetPreparedStatement",
            "athena:GetQueryResultsStream",
            "athena:BatchGetNamedQuery",
            "athena:BatchGetQueryExecution",
            "athena:ListQueryExecutions",
            "athena:ListNamedQueries",
            "athena:ListPreparedStatements",
            "athena:StartQueryExecution",
            "athena:StopQueryExecution",
            "athena:CreateNamedQuery",
            "athena:DeleteNamedQuery",
            "athena:CreatePreparedStatement",
            "athena:DeletePreparedStatement",
            "athena:UpdatePreparedStatement"
        ]
        resources = [
            aws_athena_workgroup.limited-wg.arn
        ]
    }

    statement {
        effect = "Allow"
        actions = ["glue:*"]
        resources = ["*"]
    }

    statement {
        effect = "Allow"
        actions = [
            "s3:GetBucketLocation",
            "s3:ListBucket",
            "s3:ListBucketMultipartUploads",
            "s3:ListBucketVersions",
        ]
        resources = [
            aws_s3_bucket.athena.arn,
            aws_s3_bucket.data-source.arn
        ]
    }

    statement {
        effect = "Allow"
        actions = [
            "s3:GetObject",
            "s3:ListMultipartUploadParts",
            "s3:AbortMultipartUpload",
            "s3:PutObject",
            "s3:DeleteObject"
        ]
        resources = [ "${aws_s3_bucket.athena.arn}/limited-wg/*" ]
    }

    statement {
        effect = "Allow"
        actions = [
            "s3:GetObject",
            "s3:ListMultipartUploadParts"
        ]
        resources = [ "${aws_s3_bucket.data-source.arn}/*" ]
    }
}
Preparing data for querying
Before we can actually perform any queries in Athena we need some data. We set the query limit to 20 MB so why don't we get a file with 100 MB. We will use this sample set from AWS. But because it's pretty small, we will first copy it to our local system (or CloudShell if you prefer) and cat each file several times into a new bigger file.
$ mkdir athena-sample && cd athena-sample
$ # You can change region after examples- to your region but any should work
$ aws s3 cp --recursive s3://athena-examples-us-east-1/cloudfront/plaintext/ .
$ for j in {1..100}; do for i in log*; do cat $i >> biglog; done; done
$ ls -lh
-rw-r--r--  1 ppabis  staff    97M Jan  3 10:20 biglog
-rw-r--r--  1 ppabis  staff   198K Feb 16  2017 log1
-rw-r--r--  1 ppabis  staff   199K Feb 16  2017 log2
-rw-r--r--  1 ppabis  staff    99K Feb 16  2017 log3
-rw-r--r--  1 ppabis  staff    99K Feb 16  2017 log4
-rw-r--r--  1 ppabis  staff   199K Feb 16  2017 log5
-rw-r--r--  1 ppabis  staff   199K Feb 16  2017 log6
$ # Copy it to your S3 bucket into a prefix several times
$ aws s3 cp biglog s3://data-source-202401876/cf/biglog
$ aws s3 cp biglog s3://data-source-202401876/cf/biglog2
$ aws s3 cp biglog s3://data-source-202401876/cf/biglog3
Working on Athena with the role
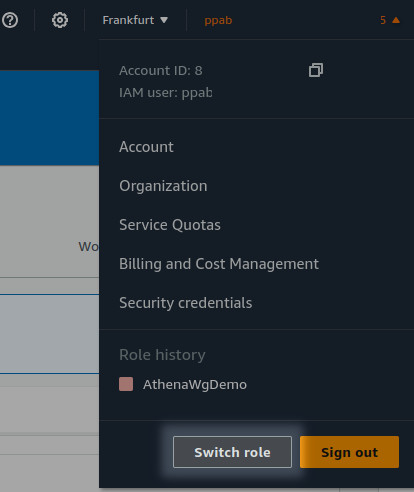
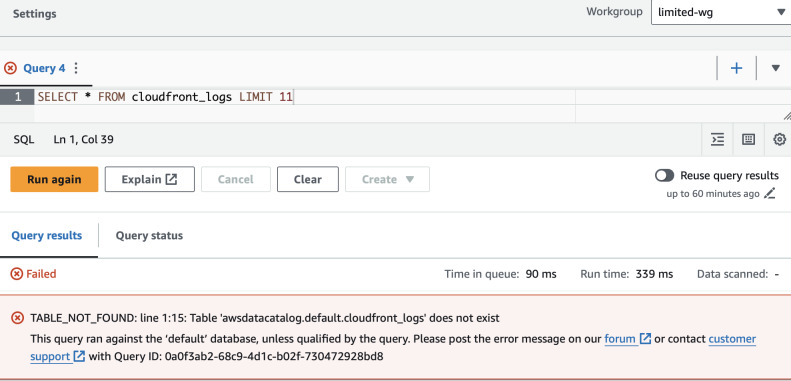
Now you can go to your AWS Console, click in top right corner where your username is displayed and click "Switch Role". Enter account number and role name (not ARN).
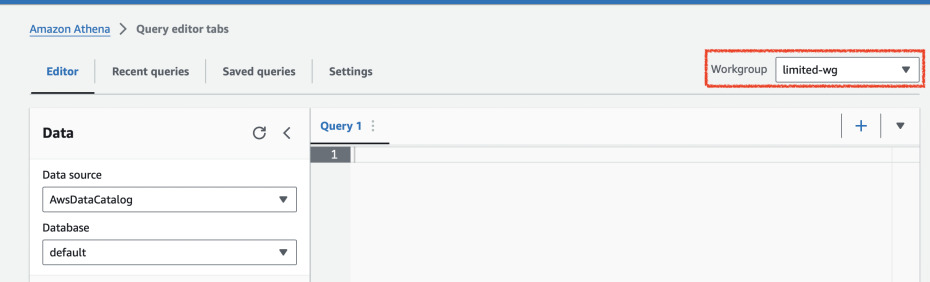
Go to Athena query editor and you should see a red message when you have primary
workgroup selected on the right. Once you switch it to limited-wg it should
not show any error.

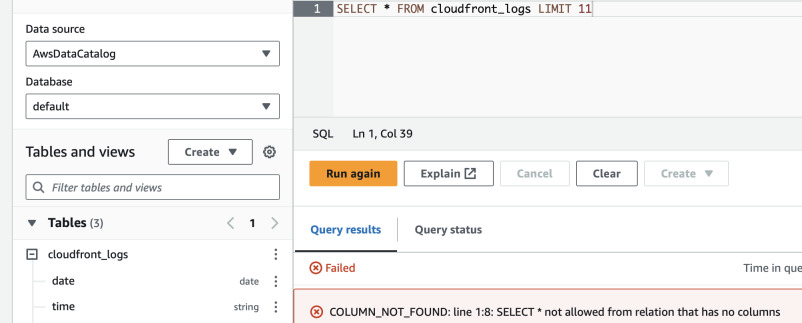
Now we can create a table in Glue Catalog (with Athena query editor). This is exact example from AWS Documentation.
CREATE EXTERNAL TABLE IF NOT EXISTS cloudfront_logs (
  `Date` DATE,
  Time STRING,
  Location STRING,
  Bytes INT,
  RequestIP STRING,
  Method STRING,
  Host STRING,
  Uri STRING,
  Status INT,
  Referrer STRING,
  ClientInfo STRING
  )
  ROW FORMAT DELIMITED
  FIELDS TERMINATED BY '\t'
  LINES TERMINATED BY '\n'
  LOCATION 's3://data-source-202401876/cf/';
Let's try out querying some records. First we will start slowly, with a limited number of records.
SELECT * FROM cloudfront_logs LIMIT 10;
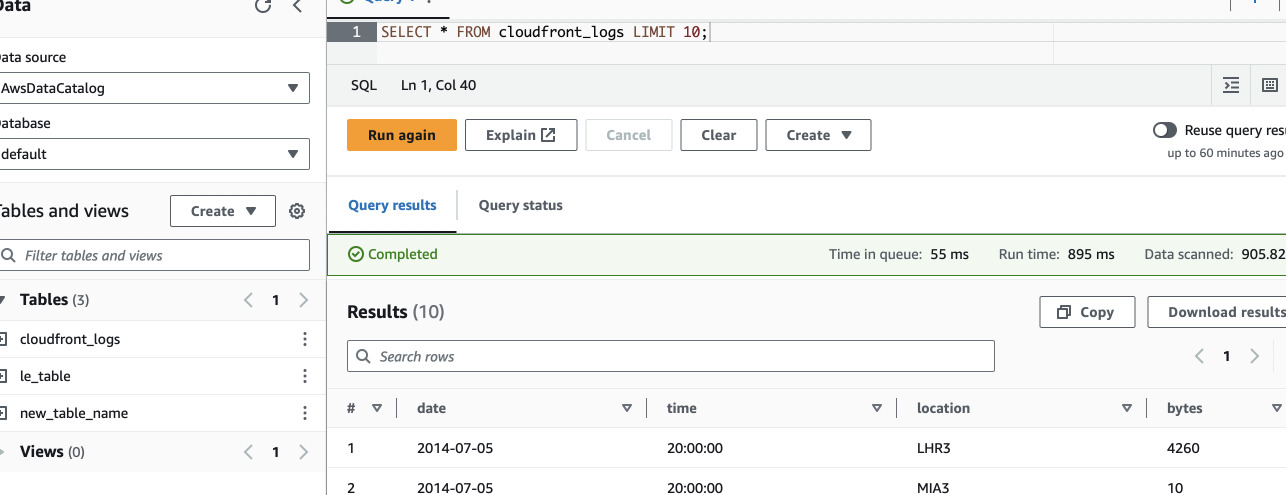
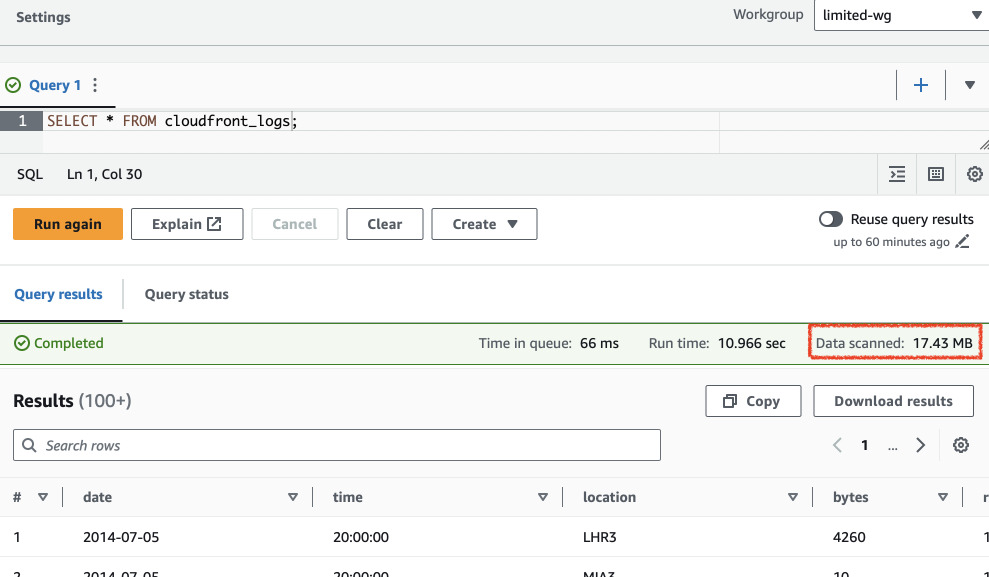
This one worked. Let's try removing the LIMIT.
SELECT * FROM cloudfront_logs;
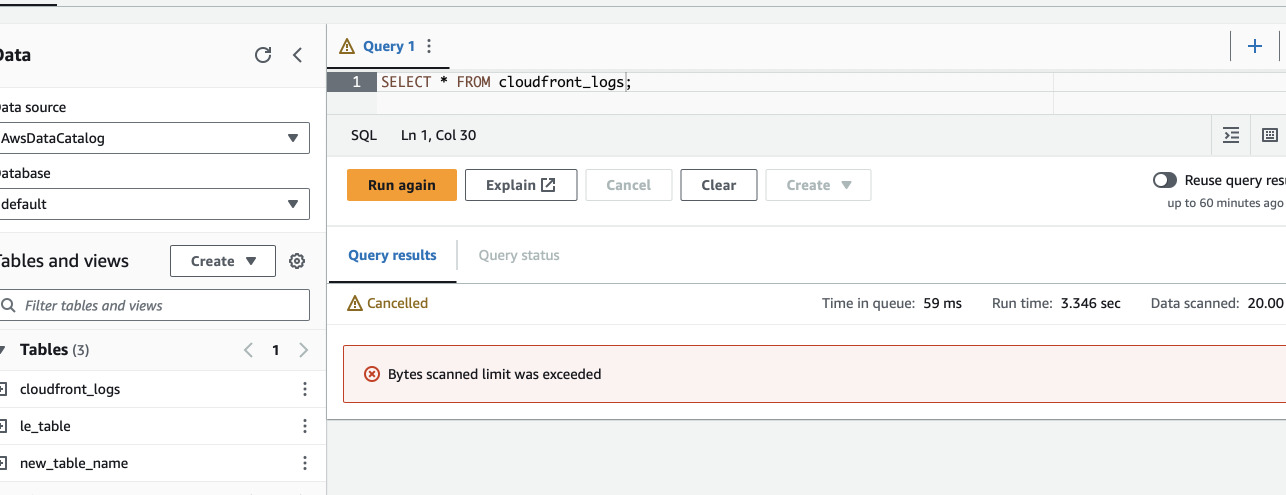
We got an error that our query is too large just as we set it up. However, we
don't want to limit the users. For example we can't also run everything with a
WHERE clause. For example:
-- This one will work
SELECT * FROM cloudfront_logs WHERE date > CAST('2014-07-04' AS DATE) LIMIT 10;
-- This one will fail
SELECT * FROM cloudfront_logs WHERE date > CAST('2014-07-05' AS DATE) LIMIT 10;
There are multiple options on what we can do. One is partitioning the data but
writing now a Glue ETL script is out of scope for this post. We will go the
easy way for this particular example and just compress the data with GZip. Again
with CloudShell or on your local machine, delete all biglog from S3, compress
it, and reupload several times.
$ aws s3 rm s3://data-source-202401876/cf/biglog
$ aws s3 rm s3://data-source-202401876/cf/biglog2
$ aws s3 rm s3://data-source-202401876/cf/biglog3
$ gzip biglog
$ ls -lh biglog.gz
-rw-r--r--. 1 cloudshell-user cloudshell-user 3.5M Jan  6 18:55 biglog.gz
$ aws s3 cp biglog.gz s3://data-source-202401876/cf/biglog.gz
$ aws s3 cp biglog.gz s3://data-source-202401876/cf/biglog2.gz
$ aws s3 cp biglog.gz s3://data-source-202401876/cf/biglog3.gz
$ aws s3 cp biglog.gz s3://data-source-202401876/cf/biglog4.gz
$ aws s3 cp biglog.gz s3://data-source-202401876/cf/biglog5.gz
Let's try full scan of the data again in Athena. This time it will work as just only ~17 MB of data will be scanned.
Managing permissions with Lake Formation
As we previously defined, the new role is only limited to an Athena workgroup. However, we gave the user full access to S3 buckets and Glue. It would be very inconvenient to manage all the permissions for each user if we scale let's say to 100 users. Lake Formation simplifies this management - it controls access to S3 and things registered in Glue Catalog. We will activate our current user to be the administrator for Lake Formation. Let's also register the S3 bucket with the source data.
resource "aws_lakeformation_data_lake_settings" "LakeSettings" {
  admins = [data.aws_caller_identity.current.arn]
}

resource "aws_lakeformation_resource" "SourceS3" {
  arn = aws_s3_bucket.data-source.arn
}
Before we start giving permissions to the test role, let's review current ones. We will use AWS CLI for that. First we will get the role ARN.
output "role_arn" {
  value = aws_iam_role.AthenaWorkgroupUserRole.arn
}
Now we can query Lake Formation to preview the permissions for the table that was created by this principal. You can use this hideous command below.
$ aws lakeformation list-permissions --region eu-west-1\
 --resource '{ "Table": { "DatabaseName": "default", "Name": "cloudfront_logs" } }'\
 --principal DataLakePrincipalIdentifier=$(terraform output -raw role_arn)
The result should show us that the role can do everything with the table - one
permission statement for "ALL" and some other actions and another for
"SELECT". This happened because we created the table when we have assumed this
role. We can revoke the permissions for "ALL" (and others) and leave only
"SELECT".
$ aws lakeformation revoke-permissions --region eu-west-1\
 --resource '{ "Table": { "DatabaseName": "default", "Name": "cloudfront_logs" } }'\
 --principal DataLakePrincipalIdentifier=$(terraform output -raw role_arn)\
 --permissions ALL ALTER DROP INSERT DELETE DESCRIBE
But even after this change, when we list the table permissions, we will see that
the user still has "ALL" in the first permissions part. This is due to the
existence of IAM_ALLOWED_PRINCIPALS in the table permissions. This is a group
for all IAM principals, so that after enabling Lake Formation you don't suddenly
lose access to your data. This permissions basically just relies on IAM to
handle authorization. Once we remove this group from our table, we will see
that the user has only SELECT now.
aws lakeformation revoke-permissions --region eu-west-1\
 --resource '{ "Table": { "DatabaseName": "default", "Name": "cloudfront_logs" } }'\
 --principal DataLakePrincipalIdentifier=IAM_ALLOWED_PRINCIPALS\
 --permissions ALL
This makes the table to be managed by Lake Formation. Now we have to allow our user to even be able to use Lake Formation. We need a new IAM policy for that.
data "aws_iam_policy_document" "LakeFormationGlueTablesAccess" {
  statement {
    effect = "Allow"
    actions = [
      "lakeformation:GetDataAccess",
      "lakeformation:GetResourceLFTags",
      "lakeformation:ListLFTags",
      "lakeformation:GetLFTag",
      "lakeformation:SearchDatabasesByLFTags"
    ]
    resources = ["*"]
  }
}
We should now be able to also disable direct S3 GetObject statement in the
previous policy and the queries should still work as now the permissions are
granted by Lake Formation.
  /* statement {
    effect = "Allow"
    actions = [
      "s3:GetObject",
      "s3:ListMultipartUploadParts"
    ]
    resources = ["${aws_s3_bucket.data-source.arn}/*"]
  } */
Now we can try revoking the SELECT permission in Lake Formation for this role.
We can also manage it via Terraform. This will be a bit tricky as permissions in
Lake Formation don't have any unique identifiers. So as we know that our test
role has only SELECT permission on cloudfront_logs table, we can apply it
again without consequences with terraform and then revoke it again by commenting
the block out. There's no way or even need to import this resource.
resource "aws_lakeformation_permissions" "TestRoleSelect" {
  permissions = ["SELECT"]
  principal   = aws_iam_role.AthenaWorkgroupUserRole.arn
  table {
    database_name = data.aws_glue_catalog_table.cloudfront_logs.database_name
    name          = data.aws_glue_catalog_table.cloudfront_logs.name
  }
}
Apply the above resource and then comment it out. Apply again and the permission should be gone. Test if you can query something in Athena.
The effect is that the table is not even visible to us in Glue Data Catalog.
Let's see if we apply DESCRIBE permission we will be able to see the table but
not query it.
Row-level access control
The most magical thing that Lake Formation does that I have no idea how could it be implemented in IAM (if even possible, for DynamoDB it is) is row-level access where the value in a column decides whether the user can see the row or not. To configure it, we need to create a new data filter in Lake Formation. Unfortunately it is not available in Terraform provider. However, it is in CloudFormation. We can create a hybrid IaC solution and use Terraform to create a CloudFormation stack with the data filter.
resource "aws_cloudformation_stack" "LFDataFilter" {
  name          = "LFDataFilter"
  template_body = file("data-filter.yml")
}
However, before we write the actual YAML, we need to know what kind of filter we want to apply. Let us explore the possibilities. In Athena I ran the following:
SELECT uri, count(uri) AS cnt FROM "default"."cloudfront_logs" GROUP BY uri;
#   uri                 cnt
1   /test-image-3.jpeg  763500
2   /test-image-2.jpeg  741500
3   /test-image-1.jpeg  993000
We know how many rows are there for each URI in the logs. We can use this one
to create a row filter. We will also limit our test user to only see several
columns: date, time, method, uri. Having the plan, implement this in
CloudFormation YAML:
Resources:
  URIFilter:
    Type: AWS::LakeFormation::DataCellsFilter
    Properties:
      TableCatalogId: !Ref AWS::AccountId
      DatabaseName: "default"
      TableName: "cloudfront_logs"
      Name: "cloudfront_logs_uri_filter"
      RowFilter:
        FilterExpression: "uri = '/test-image-2.jpeg'"
      ColumnNames: ["date", "time", "method", "uri"]
As Terraform doesn't know the data filter resource, we need to also manage the
permissions for the user in CloudFormation. We will remove the current grant
from Terraform and add it into our YAML. Delete the resource
aws_lakeformation_permissions.TestRoleSelect and add the following to the
data-filter.yml.
Parameters:
  TestRolePrincipal:
    Type: String
    Description: IAM role to manage permissions for
  DatabaseName:
    Type: String
    Description: Name of the database
    Default: "default"
  TableName:
    Type: String
    Description: Name of the table

Resources:
  TestRoleSelect:
    Type: AWS::LakeFormation::PrincipalPermissions
    Properties:
      Principal:
        DataLakePrincipalIdentifier: !Ref TestRolePrincipal
      Permissions: ["SELECT"]
      PermissionsWithGrantOption: []
      Resource:
        DataCellsFilter:
          TableCatalogId: !Ref AWS::AccountId
          DatabaseName: !Ref DatabaseName
          TableName: !Ref TableName
          Name: !Select [ "3", !Split ["|", !Ref URIFilter] ]

  URIFilter:
    Type: AWS::LakeFormation::DataCellsFilter
  ...
In the above YAML template we add three parameters - one for the role that we want to grant permissions to, database name and table name to not hardcore the values and make them manageable from a single place.
Next we add the same resource as we did in Terraform. However, as the managed
resource we select DataCellsFilter. Name in this resource is a bit tricky.
For whatever reason, CloudFormation AWS::LakeFormation::DataCellsFilter
returns a weird pipe-concatenated string of the multiple attributes of the data
filter - instead of just some ARN, name or even exposing attributes usable with
!GetAtt. So we need to split it like a normal string and take the fourth value
(indexing from 0), which is the name of the filter. See
this documentation page
for more information. I also replaced database and table names with references
to parameters in URIFilter.
We will pass the parameters to the CloudFormation stack from Terraform and reapply the stack.
resource "aws_cloudformation_stack" "LFDataFilter" {
  name          = "LFDataFilter"
  template_body = file("data-filter.yml")
  parameters = {
    TestRolePrincipal = aws_iam_role.AthenaWorkgroupUserRole.arn
    DatabaseName      = data.aws_glue_catalog_table.cloudfront_logs.database_name
    TableName         = data.aws_glue_catalog_table.cloudfront_logs.name
  }
}
Now we can see that we have limited view of the columns if we query it in Athena
and that the only uri we can see is the one we have in the filter.

SELECT COUNT(uri) as cnt, uri FROM cloudfront_logs GROUP BY uri
#   cnt     uri
1   741500  /test-image-2.jpeg