Aurora Backtracking Demo
23 December 2023
Amazon Aurora has a great feature that can save you hours of recovery from a backup in case you need to quickly restore a database. Backtracking let's you do point-in-time recovery into the same cluster. The only downside is the need to reconnect. However, what if we rewind our database and again decide that it was a bad choice, can we forward the database again? What about the records that were written after rewinding?
Today we will explore what Aurora does when rewinding into the past and "into the future".
See the repository for this post here: github.com/ppabis/aurora-backtracking
Creating a cluster
In order to experiment with this feature, we need to create an Aurora cluster. I will create a small, single-instance database. We will create an Aurora cluster with a security group that will allow our entire VPC to access it. Set backtrack window to 7200 seconds (2 hours).
data "aws_vpc" "default" {  default = true }

# Security group that will allow the entire VPC to access Aurora
resource "aws_security_group" "AuroraSG" {
  vpc_id = data.aws_vpc.default.id
  name   = "AuroraSG"
  ingress {
    from_port       = 3306
    to_port         = 3306
    protocol        = "tcp"
    cidr_blocks = [data.aws_vpc.default.cidr_block]
  }
}

# The base cluster + single instance with MySQL 5.7 compatibility
resource "aws_rds_cluster" "AuroraCluster" {
  backtrack_window       = 7200
  cluster_identifier     = "testcluster"
  master_username        = "user"
  master_password        = "Th3Secr3tAur0r4Pa5sw0rd"
  engine                 = "aurora-mysql"
  engine_version         = "5.7"
  vpc_security_group_ids = [aws_security_group.AuroraSG.id]
  skip_final_snapshot    = true
}

resource "aws_rds_cluster_instance" "AuroraInstance" {
  cluster_identifier = aws_rds_cluster.AuroraCluster.id
  instance_class     = "db.t3.small"
  identifier         = "testinstance"
  engine             = "aurora-mysql"
  engine_version     = "5.7"
}

# Store the endpoint in SSM for easy access
resource "aws_ssm_parameter" "AuroraClusterEndpoint" {
  name  = "/testaurora/endpoint"
  type  = "String"
  value = aws_rds_cluster.AuroraCluster.endpoint
}
Skip final snapshot so that we can easily destroy the infrastructure after we are done with experiments. I will also store the cluster endpoint in SSM parameter store so that I can easily retrieve it in an EC2 instance that will be used for connecting to Aurora. This instance will look the following: t4g.nano with Amazon Linux 2023, and IAM role with SSM managed instance permissions attached.
# Easily find the latest Amazon Linux in SSM
data "aws_ssm_parameter" "AL2023" {
  name = "/aws/service/ami-amazon-linux-latest/al2023-ami-kernel-6.1-arm64"
}

# Role for the instance with SSM access - Parameter Store + Session Manager
resource "aws_iam_role" "SSMInstance" {
  name               = "SSMInstanceRole"
  assume_role_policy = <<-EOF
  {
    "Version": "2012-10-17",
    "Statement": [ {
        "Action": "sts:AssumeRole",
        "Principal": { "Service": [ "ec2.amazonaws.com" ] },
        "Effect": "Allow",
        "Sid": ""
      } ]
  }
  EOF
}

resource "aws_iam_instance_profile" "SSMInstance" {
  name = "SSMInstanceRole"
  role = aws_iam_role.SSMInstance.name
}

resource "aws_iam_role_policy_attachment" "SSMInstance" {
  role       = aws_iam_role.SSMInstance.name
  policy_arn = "arn:aws:iam::aws:policy/AmazonSSMManagedInstanceCore"
}

# Allow any outbound connections from the instance - package installation and Aurora access
resource "aws_security_group" "myinstance" {
  name        = "TestInstanceSG"
  description = "TestInstanceSG"
  vpc_id      = data.aws_vpc.default.id
  egress {
    from_port   = 0
    to_port     = 0
    protocol    = "-1"
    cidr_blocks = ["0.0.0.0/0"]
  }
}

# Create Amazon Linux instance with public IP, SSM permissions and install MariaDB client on first boot
resource "aws_instance" "myinstance" {
  instance_type               = "t4g.nano"
  ami                         = data.aws_ssm_parameter.AL2023.value
  associate_public_ip_address = true
  iam_instance_profile        = aws_iam_instance_profile.SSMInstance.name
  vpc_security_group_ids      = [aws_security_group.myinstance.id]
  user_data                   = <<-EOF
  #!/bin/bash
  yum update -y
  yum install -y mariadb105
  EOF
}
Connecting to Aurora
After we are done we can try connecting to the newly created Aurora cluster. Connect to the instance (I will use Amazon Session Manager) and type the following:
$ export AURORA_HOST=$(aws ssm get-parameter --name /testaurora/endpoint --output text --query "Parameter.Value")
#Type the password from above when prompted
$ mysql -h $AURORA_HOST -u user -p
  Welcome to the MariaDB monitor.  Commands end with ; or \g.
  Your MySQL connection id is 14
  Server version: 5.7.12 MySQL Community Server (GPL)
MySQL [(none)]>
We will now insert some data to the database. I will use the following script.
CREATE DATABASE testdb;
USE testdb;
CREATE TABLE players(id INT PRIMARY KEY AUTO_INCREMENT, username VARCHAR(30));
INSERT INTO players(username) VALUES ("Alice"), ("Bob"), ("Charlie");
Now take note of the current time. Wait 10 or 20 minutes and insert some more data. For me the time now is 13:55. At 14:05 I inserted the following:
USE testdb;
INSERT INTO players(username) VALUES ("Dave"), ("Eve"), ("Frank");
CREATE TABLE games(id INT PRIMARY KEY AUTO_INCREMENT, player1 INT, player2 INT, score INT);
INSERT INTO games(player1, player2, score) VALUES (1, 2, 10), (1, 3, 20), (2, 3, 30);
Check the list of players and tables by issuing SELECT and SHOW TABLES;
statements.
MySQL [(none)]> USE testdb;
MySQL [testdb]> SHOW TABLES;
+------------------+
| Tables_in_testdb |
+------------------+
| games            |
| players          |
+------------------+
2 rows in set (0.001 sec)
MySQL [testdb]> SELECT * FROM players;
+----+----------+
| id | username |
+----+----------+
|  1 | Alice    |
|  2 | Bob      |
|  3 | Charlie  |
|  4 | Dave     |
|  5 | Eve      |
|  6 | Frank    |
+----+----------+
6 rows in set (0.001 sec)
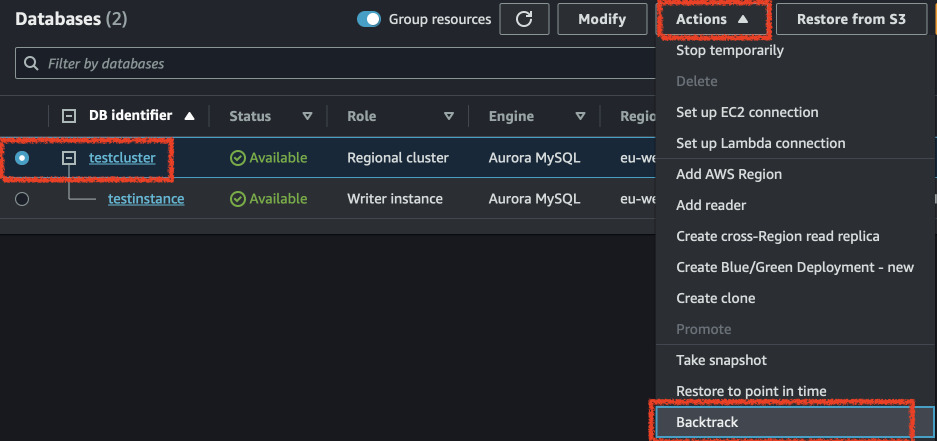
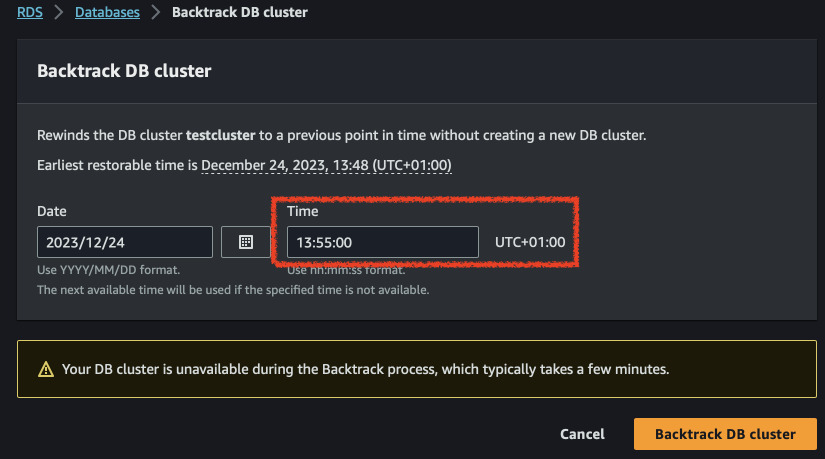
Now we will rewind the database to the time before we ran the second script. Go to the RDS console, select the cluster and click on "Backtrack". Select a date that is around the time you inserted the first script. For me it will be 13:55. Wait until the cluster goes available again and check the values in the tables.
MySQL [(none)]> USE testdb;
MySQL [testdb]> SHOW TABLES;
+------------------+
| Tables_in_testdb |
+------------------+
| players          |
+------------------+
1 rows in set (0.001 sec)
MySQL [testdb]> SELECT * FROM players;
+----+----------+
| id | username |
+----+----------+
|  1 | Alice    |
|  2 | Bob      |
|  3 | Charlie  |
+----+----------+
3 rows in set (0.001 sec)
So our database is now in the state from 13:55. Let's try creating a new table, altering players one and inserting different data. After inserting we should verify what are the current contents.
ALTER TABLE players ADD COLUMN sum_score INT DEFAULT 0;
CREATE TABLE login_history(id INT PRIMARY KEY AUTO_INCREMENT, player_id INT, login_time DATETIME);
INSERT INTO login_history(player_id, login_time) VALUES (1, NOW() - INTERVAL 1 HOUR), (2, NOW() - INTERVAL 2 HOUR), (3, NOW() - INTERVAL 3 HOUR);
INSERT INTO players(username, sum_score) VALUES ("George", 100), ("Helen", 200), ("Ivan", 300);
MySQL [testdb]> SELECT * FROM players;
+----+----------+-----------+
| id | username | sum_score |
+----+----------+-----------+
|  1 | Alice    |         0 |
|  2 | Bob      |         0 |
|  3 | Charlie  |         0 |
|  4 | George   |       100 |
|  5 | Helen    |       200 |
|  6 | Ivan     |       300 |
+----+----------+-----------+
6 rows in set (0.001 sec)
MySQL [testdb]> SHOW TABLES;
+------------------+
| Tables_in_testdb |
+------------------+
| login_history    |
| players          |
+------------------+
2 rows in set (0.001 sec)
So, now we can "forward-track" the database to the values from 14:05. What will be the result? Let's find out.
MySQL [(none)]> USE testdb;
MySQL [testdb]> SHOW TABLES;
+------------------+
| Tables_in_testdb |
+------------------+
| games            |
| players          |
+------------------+
2 rows in set (0.001 sec)
MySQL [testdb]> SELECT * FROM players;
+----+----------+
| id | username |
+----+----------+
|  1 | Alice    |
|  2 | Bob      |
|  3 | Charlie  |
|  4 | Dave     |
|  5 | Eve      |
|  6 | Frank    |
+----+----------+
6 rows in set (0.001 sec)
We are back to the state from 14:05. That means that each backtrack action is
like taking the entire database snapshot and placing it in the backtrack history
as a new state on top. If we backtrack again to 14:15 (after running the third
SQL script), we should get the values with login_history and sum_score.
The image below should explain it better.
![]()
So in case we are in production, we backtrack to a previous state after our users already created records, we might be in a state where we have conflicts. One of the solutions would be to create a new cluster with point-in-time recovery from a backup. Then we can try to merge the data from the two clusters into the current one. With incremental primary keys this can be very difficult so UUID can be utilized instead. Another way is to keep track of all the changes via a queue like Kinesis or SQS and keep the history in S3 formatted as JSON. That way we can create a script that can replay the changes and intelligently select values even long after the problem occurred.