I want to migrate to Aurora but I chose MariaDB. What now?
21 November 2023
We all have been there. Well, not exactly, some of us planned ahead to keep the options open. But we all feared Oracle and wanted to jump to MariaDB. And now we learned about all the benefits of Aurora and we are still on this RDS, the button for "Create Aurora Read replica" is not appearing anywhere in the console. Ok, let's do it with two steps.

Creating a new MariaDB instance
So for our testing we will build two databases. One will be our MariaDB source
database that will act as the mock production. We will also have MySQL 5.7 to
which we will migrate. We can use simple SQL dumps as they are mostly
harmless compatible but let's go with AWS DMS so we get some assurance.
First we will define MariaDB single instance in Terraform. In this step you can
also define a management instance that will act as a bastion if you don't want
to expose the database to the public. In the repository the code for the
instance is included. To have better control over the instance we will also use
Secrets Manager to store the password. In CloudFormation it is possible to
generate a password directly from Secrets Manager but in Terraform I didn't find
this functionality. Therefore I will use HashiCorp's random provider to get a
random password.
# For convenience, I will already create also password for target MySQL.
locals {
  databases = toset(["MariaDB", "MySQL57"])
}

resource "random_password" "passwords" {
  for_each = local.databases
  length   = 24
  special  = false
}

resource "aws_secretsmanager_secret" "creds" {
  for_each    = local.databases
  name        = "${each.key}Credentials"
  description = "Credentials for the ${each.key}"
}

resource "aws_secretsmanager_secret_version" "creds" {
  for_each  = local.databases
  secret_id = aws_secretsmanager_secret.creds[each.key].id
  secret_string = jsonencode({
    username = lower(each.key)
    password = random_password.passwords[each.key].result
  })
}
I will be defining my database in a new VPC and private subnets. But it's up to
you. We will also create outputs for the endpoint and password so we can use
them later to fill the DB with data. I will define subnet group with all AZs in
eu-west-1 and allow all traffic from the VPC CIDR block. For the future DMS
requirements, we will also change some binlog settings in a new parameter group.
If you happen to create parameter group later, remember to reboot the MariaDB
instance manually!
resource "aws_vpc" "production" {
    cidr_block = "10.6.0.0/16"
    enable_dns_hostnames = true
    enable_dns_support = true
}

resource "aws_subnet" "production" {
  count             = 3
  vpc_id            = aws_vpc.production.id
  cidr_block        = "10.6.${count.index}.0/24"
  availability_zone = join("", ["eu-west-1", ["a", "b", "c"][count.index]])
}

resource "aws_db_subnet_group" "MariaDB" {
  name       = "mariadb"
  subnet_ids = aws_subnet.production[*].id
}

resource "aws_security_group" "MariaDB" {
  vpc_id = aws_vpc.production.id
  ingress {
    from_port   = 3306
    to_port     = 3306
    protocol    = "tcp"
    cidr_blocks = [aws_vpc.production.cidr_block]
  }
}

resource "aws_db_parameter_group" "MariaDB" {
  family = "mariadb10.6"
  name   = "mariadb-custom"
  parameter {
    name  = "binlog_format"
    value = "ROW"
  }

  parameter {
    apply_method = "pending-reboot"
    name         = "binlog_checksum"
    value        = "NONE"
  }

  parameter {
    apply_method = "pending-reboot"
    name         = "binlog_row_image"
    value        = "FULL"
  }
}

resource "aws_db_instance" "MariaDB" {
  engine                  = "mariadb"
  instance_class          = "db.t2.small"
  allocated_storage       = 20
  storage_type            = "gp3"
  engine_version          = "10.6"
  db_subnet_group_name    = aws_db_subnet_group.MariaDB.name
  publicly_accessible     = false           # Change this if you like
  backup_retention_period = 3
  password                = random_password.passwords["MariaDB"].result
  username                = "mariadb"
  vpc_security_group_ids  = [aws_security_group.MariaDB.id]
  parameter_group_name    = aws_db_parameter_group.MariaDB.name
}

output "mariadb-endpoint" {
    value = aws_db_instance.MariaDB.address
}

output "mariadb-password" {
  value     = random_password.passwords["MariaDB"].result
  sensitive = true
}
Creating the instance might take terribly long time, so be patient. After 10
minutes or so you can connect to your instance. Use output values to get the
connection string. Use terraform output -raw mariadb-password to get the
password that you can use to connect to the database.
$ sudo yum install -y mariadb105
$ mysql -umariadb -hterraform-12345678901234.abcdef123.eu-west-1.rds.amazonaws.com -P3306 -p
Enter password:
Welcome to the MariaDB monitor.  Commands end with ; or \g.
Your MariaDB connection id is 71
Server version: 10.6.14-MariaDB-log managed by https://aws.amazon.com/rds/
Generating the data
We will create a Python script that will create random data that will create an SQL file to load. This will be simpler than connecting to the DB and installing all the PIP packages.
But first let's make an example schema that will be a bit complex so that we can benchmark DMS possibilities.
CREATE DATABASE `gamers`;
USE `gamers`;
CREATE TABLE `players` (
    id INT NOT NULL AUTO_INCREMENT PRIMARY KEY,
    name VARCHAR(50) NOT NULL UNIQUE
);

CREATE TABLE `games` (
    id INT NOT NULL AUTO_INCREMENT PRIMARY KEY,
    user1 INT NOT NULL,
    user2 INT NOT NULL,
    score1 INT NOT NULL,
    score2 INT NOT NULL,
    CONSTRAINT FOREIGN KEY (user1) REFERENCES players(id),
    CONSTRAINT FOREIGN KEY (user2) REFERENCES players(id)
);

CREATE TABLE `friend_requests` (
    user1 INT NOT NULL,
    user2 INT NOT NULL,
    CONSTRAINT FOREIGN KEY (user1) REFERENCES players(id),
    CONSTRAINT FOREIGN KEY (user2) REFERENCES players(id),
    CONSTRAINT UNIQUE KEY (user1, user2)
);

CREATE TABLE `friendships` (
    user1 INT NOT NULL,
    user2 INT NOT NULL,
    CONSTRAINT FOREIGN KEY (user1) REFERENCES players(id),
    CONSTRAINT FOREIGN KEY (user2) REFERENCES players(id),
    CONSTRAINT UNIQUE KEY (user1, user2)
);

DELIMITER //
CREATE PROCEDURE AcceptFriendship(IN userA INT, IN userB INT)
BEGIN
    START TRANSACTION;
    INSERT INTO friendships (user1, user2) VALUES (userA, userB);
    INSERT INTO friendships (user1, user2) VALUES (userB, userA);
    DELETE FROM friend_requests WHERE user1 = userA AND user2 = userB;
    COMMIT;
END //
DELIMITER ;
Put the above code into schema.sql file and apply it to MariaDB.
$ cat schema.sql | mysql -umariadb ... -p
Now as we know our schema let's do some Python script that will fill it up with data. We don't need to use stored procedure but why not. Let's test it to accept half of the friend requests.
import requests, random

RANDOM_NAMES = "https://raw.githubusercontent.com/dominictarr/random-name/master/first-names.txt"
names = requests.get(RANDOM_NAMES).text.split("\n")
random.shuffle(names)

USER_COUNT = len(names)
GAME_COUNT = USER_COUNT * 3
FRIEND_REQUESTS = USER_COUNT // 4
FRIEND_ACCEPTS = FRIEND_REQUESTS // 2

with open("data.sql", "w") as f:
    f.write("USE gamers;\n")
    for i in range(USER_COUNT):
        f.write(f"INSERT INTO players (name) VALUES ('{names[i]}');\n")
    for i in range(GAME_COUNT):
        user1 = (i + 123) % (USER_COUNT - 1) + 1
        user2 = (i + 345) % (USER_COUNT - 1) + 1
        score1 = random.randint(0, 100)
        score2 = random.randint(0, 100)
        f.write(f"INSERT INTO games (user1, user2, score1, score2) VALUES ({user1}, {user2}, {score1}, {score2});\n")
    for i in range(FRIEND_REQUESTS):
        user1 = i + 1
        user2 = FRIEND_REQUESTS + 101 + i
        f.write(f"INSERT INTO friend_requests (user1, user2) VALUES ({user1}, {user2});\n")
    for i in range(FRIEND_ACCEPTS):
        user1 = i + 1
        user2 = FRIEND_REQUESTS + 101 + i
        f.write(f"CALL AcceptFriendship({user1}, {user2});\n")
Now the file should be executed the same way as schema by piping it to the MySQL client. After two minutes we will have a database that is ready to be migrated.
Creating MySQL target
Next we will create the target MySQL instance. For full Aurora compatibility we will use MySQL 5.7. For simplicity, let's put the instance in the same VPC and use the same security group.
resource "aws_db_instance" "MySQL" {
  engine                  = "mysql"
  instance_class          = "db.t2.small"
  allocated_storage       = 20
  storage_type            = "gp3"
  engine_version          = "5.7"
  db_subnet_group_name    = aws_db_subnet_group.MariaDB.name
  publicly_accessible     = false           # Change this if you like
  backup_retention_period = 3
  password                = random_password.passwords["MySQL57"].result
  username                = "mysql57"
  vpc_security_group_ids  = [aws_security_group.MariaDB.id]
}

output "mysql-endpoint" {
    value = aws_db_instance.MySQL.address
}

output "mysql-password" {
  value     = random_password.passwords["MySQL57"].result
  sensitive = true
}
We will also prepare the Secrets Manager secrets for DMS so that it can be easily attached. For that we will crete a new secret version but it will contain the same password. It will be just dependent on created instances.
resource "aws_secretsmanager_secret_version" "updated-mariadb" {
  secret_id = aws_secretsmanager_secret.creds["MariaDB"].id
  secret_string = jsonencode({
    engine   = "mariadb"
    username = "mariadb"
    password = random_password.passwords["MariaDB"].result
    host     = aws_db_instance.MariaDB.address
    port     = aws_db_instance.MariaDB.port
  })
}

resource "aws_secretsmanager_secret_version" "updated-mysql" {
  secret_id = aws_secretsmanager_secret.creds["MySQL57"].id
  secret_string = jsonencode({
    engine   = "mariadb"
    username = "mysql57"
    password = random_password.passwords["MySQL57"].result
    host     = aws_db_instance.MySQL.address
    port     = aws_db_instance.MySQL.port
  })
}
Migrating with DMS
We have almost everything prepared. We now need to just create a DMS instance that will migrate our data from MariaDB to MySQL.
First of all, we have to create an IAM role that will let DMS access Secrets Manager. Next we will create endpoints for source MariaDB and target MySQL. Finally, our we will create the instance.
I won't put the whole IAM config in here. The role requires access to both
secrets with secretsmanager:GetSecretValue and the principal has to be
regional DMS endpoint, in my case dms.eu-west-1.amazonaws.com. We also need
another role that will be used by DMS to create stuff in the VPC. This time we
won't attach the role but name it appropriately dms-vpc-role with AWS managed
policy service-role/AmazonDMSVPCManagementRole. This time the principal will
be just dms.amazonaws.com.
The endpoints will look like this for MariaDB. Target will look very similar,
just change endpoint_type and parameters and add extra_connection_attributes
with value Initstmt=SET FOREIGN_KEY_CHECKS=0;.
resource "aws_dms_endpoint" "source" {
  secrets_manager_access_role_arn = aws_iam_role.DmsRole.arn
  secrets_manager_arn             = aws_secretsmanager_secret.creds["MariaDB"].arn
  endpoint_type                   = "source"
  engine_name                     = "mariadb"
  endpoint_id                     = "mariadb-source"
}
The instance should be attached to any subnet in our VPC and it also requires
security group. It is recommended to put the instance in a private subnet where
the target database is located. However, as the demo database is tiny, I will
just put it wherever by selecting the first one. It's also important to provide
VPC endpoint if you are using private subnets. Otherwise the instance will not
even come up. The service name in this region will be
com.amazonaws.eu-west-1.dms. Another one that is required is
com.amazonaws.eu-west-1.secretsmanager otherwise we won't get any connection
working. Remember to enable private DNS names for both.
# Skipped IAM, VPC Endpoint and VPC Endpoint Security Group

resource "aws_dms_replication_subnet_group" "subnets" {
  replication_subnet_group_id          = "dms-subnets"
  replication_subnet_group_description = "DMS Subnets in Production VPC"
  subnet_ids                           = aws_subnet.production[*].id
  # Needs to be created after the role
  depends_on                           = [aws_iam_role_policy_attachment.dms-vpc-policy]
}

resource "aws_security_group" "DMS-SG" {
  name   = "DMS-SG"
  vpc_id = aws_vpc.production.id
  egress {
    from_port   = 0
    to_port     = 0
    protocol    = "-1"
    cidr_blocks = ["0.0.0.0/0"]
  }
}

resource "aws_dms_replication_instance" "instance" {
  replication_subnet_group_id = aws_dms_replication_subnet_group.subnets.id
  replication_instance_class  = "dms.t2.micro"
  allocated_storage           = 20
  engine_version              = "3.5.1"
  vpc_security_group_ids      = [aws_security_group.DMS-SG.id]
  replication_instance_id     = "dms-instance"
  depends_on                  = [aws_vpc_endpoint.dms-endpoint]
}
Starting replication
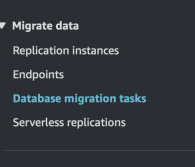
For our convenience we will just use AWS console to create replication task. Go to DMS console, select "Database Migration Tasks" and "Create task". Select created endpoints and instance. I will select full load and CDC mode.
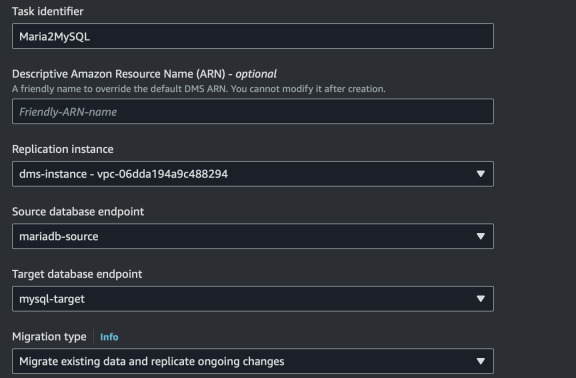
Let's also use some other features. I selected full LOB mode (even though we
don't have any LOBs). Turn on CloudWatch logs but use default settings in here.
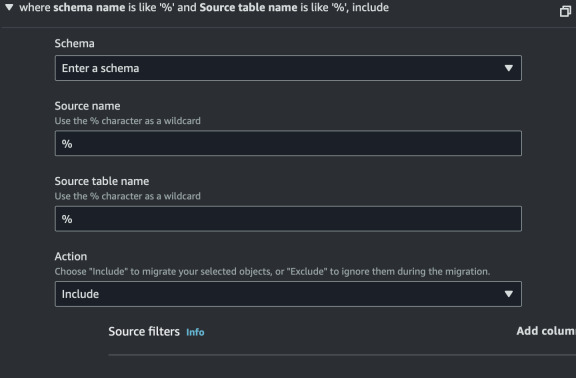
In "Table mappings" add a new rule that will use wildcard (%) - migrate all
data.
We will also enable "Premigration assessment". Select all of them. For this I will also create an S3 bucket and IAM role that will be used by DMS to upload the report. Create the following role, bucket and policy in Terraform.
resource "aws_s3_bucket" "dms-reports" {
  bucket = "dms-reports-371284712893"
}

resource "aws_s3_bucket_policy" "dms-reports" {
    bucket = aws_s3_bucket.dms-reports.id
    policy = jsonencode({
        Version = "2012-10-17"
        Statement = [ {
        Effect = "Allow"
        Principal = { AWS = aws_iam_role.dms-premigration-role.arn }
        Action = "s3:PutObject"
        Resource = "${aws_s3_bucket.dms-reports.arn}/*"
        } ]
    })
}

resource "aws_iam_role" "dms-premigration-role" {
    name = "dms-premigration-role"
    assume_role_policy = jsonencode({
        Version = "2012-10-17"
        Statement = [ {
            Effect = "Allow"
            Principal = { Service = "dms.amazonaws.com" }
            Action = "sts:AssumeRole"
        } ]
    })
}

# For convenience. Bucket name must start with `dms-`. Otherwise provide your
# own policy.
resource "aws_iam_role_policy_attachment" "dms-premigration-policy" {
    role       = aws_iam_role.dms-premigration-role.name
    policy_arn = "arn:aws:iam::aws:policy/service-role/AmazonDMSRedshiftS3Role"
}
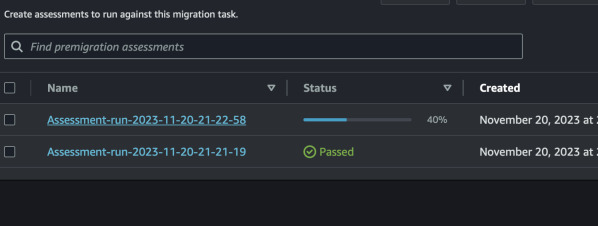
Now the premigration assessment should run. If not, then try selecting the newly
created task in AWS Console and running it manually from Actions menu. After
the assessment is done, you will see the results inside the details of migration
task in the Premigration Assessments tab. More detailed information about the
assessment is uploaded to S3 bucket in JSON format.
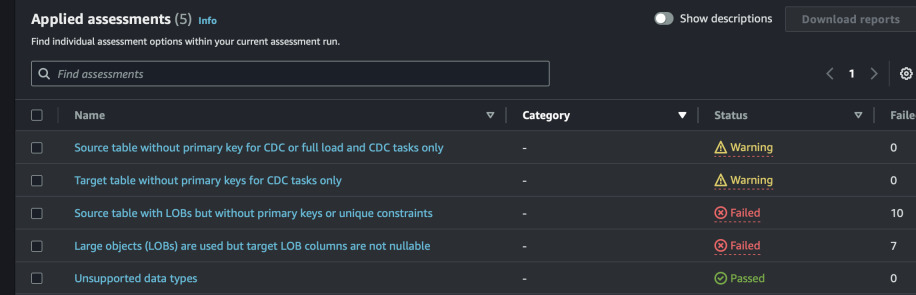

That's a bummer. We have some errors that seem quite significant. After all,
should we also migrate all the system tables such as mysql,
performance_schema, etc? Let's try to exclude them by using Table Mapping
rules from task definition. The new rules should look like this. All schema
tables, mysql and sys will not be in scope of this migration task.
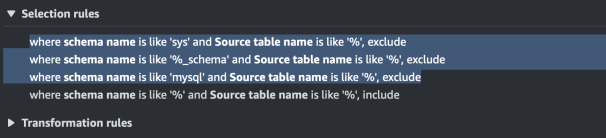
Redo the assessment. Now we can start the task without any worries. Select the task and click "Restart/Resume". The progress should go up.
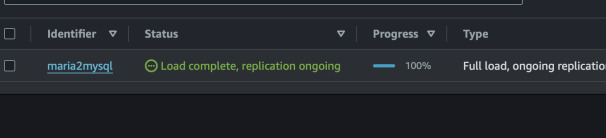
The data was definitely copied as we can see by logging in into the target
MySQL instance. However, the procedure was not copied. This requires either
manual intervention or doing some magic with the rules and trying to extract
it from mysql or information_schema.
Let's test CDC. Log in into MariaDB, insert a record and see if it was replicated to MySQL.
$ mysql -umariadb -hterraform-12345.dsyfgsadyu.eu-west-1.rds.amazonaws.com -p'xxxxyyyy'
MariaDB [(none)]> USE gamers; INSERT INTO players(name) VALUES ('DominoJachas');

Database changed
Query OK, 1 row affected (0.004 sec)
MariaDB [gamers]> \q
Bye
$ mysql -umysql57 -hterraform-123123123.gfsdafg78ew.eu-west-1.rds.amazonaws.com -p'aabbbbbaaababaab'
MySQL [(none)]> USE gamers; SELECT * FROM players ORDER BY id DESC LIMIT 5\G

Database changed
*************************** 1. row ***************************
  id: 4947
name: DominoJachas
*************************** 2. row ***************************
  id: 4946
name: Marita
Aurora Read Replica
We see that our new record was copied, hooray! Now we can create a read replica from that will be using Aurora engine.
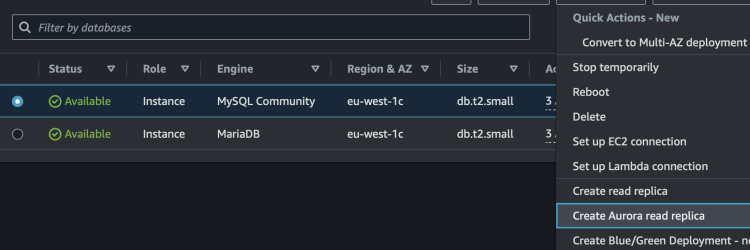
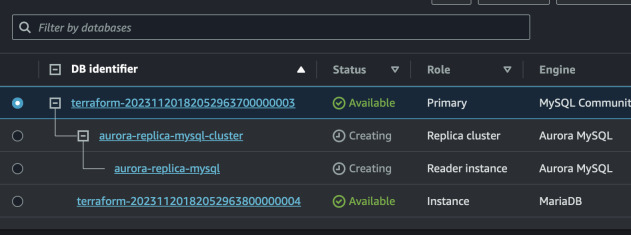
Log in to the Aurora instance by copying any of the endpoint in AWS Console. Use the same credentials as for MySQL.
$ mysql -umysql57 -haurora-replica-mysql-cluster.cluster-etaw6et63.eu-west-1.rds.amazonaws.com -p'aaaaababbaba'
MySQL [gamers]> USE gamers; SELECT * FROM players ORDER BY id DESC LIMIT 5\G
*************************** 1. row ***************************
  id: 4947
name: DominoJachas
*************************** 2. row ***************************
  id: 4946
name: Marita
*************************** 3. row ***************************
  id: 4945
name: Frederique
Exit this session and insert another record on MariaDB. Log back to Aurora and see the replication.
$ mysql -umariadb -hterraform-34234234.hfdufhsad.eu-west-1.rds.amazonaws.com -p'xxxxxyyyyyxyxyx'
MariaDB [(none)]> USE gamers; INSERT INTO players(name) VALUES ("TytusBomba"), ("ChorazyTorpeda"), ("SebekBak");
Database changed
Query OK, 3 rows affected (0.004 sec)
Records: 3  Duplicates: 0  Warnings: 0
$ mysql -umysql57 -haurora-replica-mysql-cluster.cluster-etaw6et63.eu-west-1.rds.amazonaws.com -p'aaaaababbaba'
MySQL [(none)]> USE gamers; SELECT * FROM players ORDER BY id DESC LIMIT 5;
Database changed
+------+----------------+
| id   | name           |
+------+----------------+
| 4950 | SebekBak       |
| 4949 | ChorazyTorpeda |
| 4948 | TytusBomba     |
| 4947 | DominoJachas   |
| 4946 | Marita         |
+------+----------------+
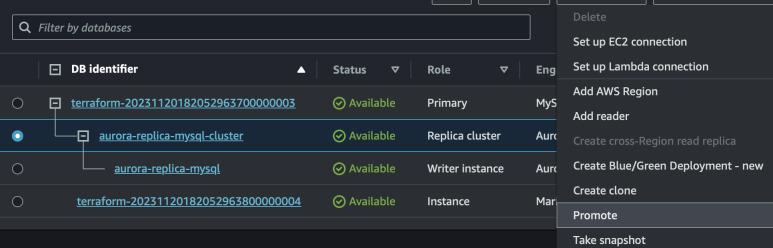
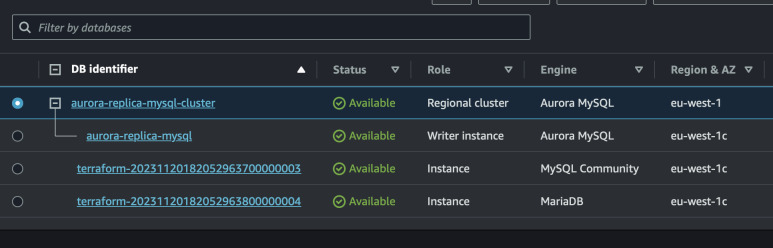
The replication is still in place. Now it's time to promote Aurora to standalone database. This is the point when you require necessary downtime, so no new records are added into MariaDB. We can repeat the process to ensure that after inserting more records to MariaDB, they won't be replicated to Aurora anymore.
$ mysql -umariadb -hterraform-34234234.hfdufhsad.eu-west-1.rds.amazonaws.com -p'xxxxxyyyyyxyxyx'
MariaDB [(none)]> USE gamers; INSERT INTO players(name) VALUES ("Michalek");
Database changed
Query OK, 1 row affected (0.004 sec)
MariaDB [gamers]> SELECT * FROM players ORDER BY id DESC LIMIT 5;
+------+----------------+
| id   | name           |
+------+----------------+
| 4951 | Michalek       |
| 4950 | SebekBak       |
| 4949 | ChorazyTorpeda |
| 4948 | TytusBomba     |
| 4947 | DominoJachas   |
+------+----------------+
$ mysql -umysql57 -haurora-replica-mysql-cluster.cluster-etaw6et63.eu-west-1.rds.amazonaws.com -p'aaaaababbaba'
MySQL [(none)]> USE gamers; SELECT * FROM players ORDER BY id DESC LIMIT 5;
Database changed
+------+----------------+
| id   | name           |
+------+----------------+
| 4950 | SebekBak       |
| 4949 | ChorazyTorpeda |
| 4948 | TytusBomba     |
| 4947 | DominoJachas   |
| 4946 | Marita         |
+------+----------------+
FAQ
Q: Why not just use DMS or mysqldump directly from MariaDB to Aurora? A: Yes.
That way we can try multiple things at once - replicating with DMS and creating read replicas.